


7
LEARNING TO STICK WELD
7
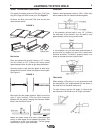
Overhead Welding
Various techniques are used for overhead welding.
However, in the interest of simplicity for the inexperi-
enced welder the following technique will probably
take care of most of his needs for overhead welding:
1. Use 1/8" (3.2mm) at 90-105 amps or 3/32" (2.4mm)
at 60 amps Fleetweld® 180 electrode.
2. Put the electrode in the holder so it sticks straight
out.
3. Hold the electrode at an angle approximately 30°
off vertical, both seen from the side and seen from
the end.
The most important thing is to hold a VERY SHORT
arc. (A long arc will result in falling molten metal; a
short arc will make the metal stay.)
If necessary — and that is dictated by the looks of
the molten puddle — a slight back and forth motion
along the seam with the electrode will help prevent
“dripping.”
Welding Sheet Metal
Welding sheet metal presents an additional problem.
The thinness of the metal makes it very easy to burn
through. Follow these few simple rules:
1. Hold a very short arc. (This prevents burn through,
since beginners seem to hold too long an arc.)
2. Use 1/8” (3.2mm) or 3/32" (2.4mm) Fleetweld® 180
electrode.
3. Use low amperage. 75 amps for 1/8" (3.2mm) elec-
trode, 40-60 amps for 3/32" (2.4mm) electrode.
4. Move fast. Don’t keep the heat on any given point
too long. Keep going. Whip the electrode.
5. Use lap welds whenever possible. This doubles the
thickness of the metal.
Hardfacing
There are several kinds of wear. The two most often
encountered are:
1. Metal to Ground Wear.
(Plowshares, bulldozer blades, buckets, cultivator
shares, and other metal parts moving in the soil.)
2. Metal to Metal Wear.
(Trunnions, shafts, rollers and idlers, crane and
mine car wheels, etc.)
Each of these types of wear demands a different kind
of hardsurfacing electrode.
When applying the proper electrode, the service life of
the part will in most cases be more than double. For
instance, hardsurfacing of plowshares results in 3-5
times more acreage plowed.
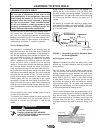
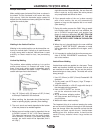
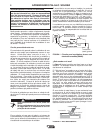
How to Hardface the Sharp Edge (Metal to Ground
Wear)
1. Grind the share, approximately one inch (25mm)
wide along the edge, so the metal is bright.
2. Place the share on an incline of approximately 20-
30°. The easiest way to do this is to put one end of
the share on a brick. (See drawing.)
Most users will want to hardface the underside of
the share, but some might find that the wear is on
the top side. The important thing is to hardface the
side that wears.
3. Use 1/8" (3.2mm) Wearshield™ ABR electrode at
90-105 amps. Strike the arc about one inch (25mm)
from the sharp edge.
4. The bead should be put on with a weaving motion,
and it should be 1/2” to 3/4" (12.5 to 19mm) wide.
Do not let the arc blow over the edge, as that will
dull the edge. (See drawing.)
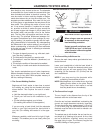
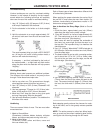
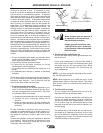
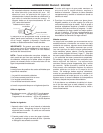
5. Use the back-stepping method. Begin to weld 3"
(75mm) from the heel of the share and weld to the
heel. The second weld will begin 6" (150mm) from
the heel, the third weld 9" (225mm) from the heel,
etc.
Back-stepping greatly reduces the chances for crack-
ing of the share, and it also greatly reduces possible
warpage.
NOTE: The entire process is rather fast. Many begin-
ners go much too slow when hardfacing plow shares,
running the risk of burning through the thin metal.
BACK-STEPPING