


OPERATING INSTRUCTIONS
B-5B-5
NA-5
11. Set the travel speed as specified by
the procedures. With the wire feeder
travel switch set to “Hand Travel”, the
travel runs without welding, permitting
accurate measurement of travel
speed. When using a Lincoln travel
carriage, adjust the speed with the
rheostat and the direction with the
toggle switch on the carriage control
panel.
12. Connect the work lead to the work or
a suitable piece of scrap. Clip the
end of the electrode to a sharp point.
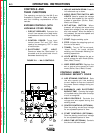
13. Preset the “Start” (if used), “Weld”,
and “Crater” (if used) controls to the
wire speed and voltage specified in
the procedure.
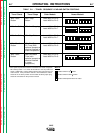
14. Make several test welds, readjusting
the controls in the following order:
a. Set the “Arc Striking”, “Inch Wire
Speed”, and “Volts” controls for
optimum arc striking. The
optimum strike control settings for
most processes will be typically 4
to 5 volts higher than the weld
mode voltage setting and 40% to
50% of the weld mode wire feed
speed setting (possibly lower if
cold starting is used).
b. If striking is still not satisfactory,
refer to the section on
Setting
Travel Starting and Stopping
or
IM305 Sec. T3.5.2 for information
on wire feed motor acceleration.
c. If installed, adjust the “Start
Controls” to set the welding
procedures for the time set on the
timer to provide the bead size,
penetration, or other factor as
needed for the application.
d. If installed, adjust the “Crater
Controls” to set the welding
procedures for the set time after
the “Stop” button is pressed to
provide the bead size or fill the
crater as needed for the
application.
e. Set the “Burnback Time” to
provide the stopping char-
acteristics needed.
STARTING AND STOPPING
SEQUENCES
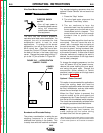
MEANS OF ARC STRIKING
The NA-5 Codes utilize “hot start” arc
striking which operates as follows:
1. With the electrode not touching the
work, press the “Start” button.
2. The electrically “hot” electrode
inches down as set by the “Inch Wire
Speed” control.
3. When the electrode makes contact
with the work, the arc strikes and the
circuit automatically switches from
“Strike” settings to “Weld” (or “Start”,
if used) settings.
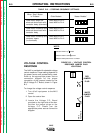
NA-5 models above Code 8300 offer both
“hot start” arc striking, as described
above, or “Cold Start” arc striking which
operates as follows:
1. Press the “Inch Down” button until the
tip of the electrode touches the work,
automatically stops, and the flux (if
used) is automatically dispensed.
NOTE: If inch speed is set too high, the
electrode may stop with too much force on
its tip, resulting in possible poor starting.
2. The arc establishes when the “Start”
button is pressed, and the circuit
automatically switches to “Weld” (or
“Start”, is used) settings. Should the
arc not start immediately, the wire will
retract slightly until the arc is
established and then feed down in the
normal manner.
Use either the standard “on-the-fly” travel
starting or rewire the controls for “standstill”
travel starting as described in the
Setting
Travel Starting and Stopping
section.
Optional “Start Controls”
Recommended for applications where
penetration, bead size, and other
characteristics must be carefully controlled
at the start.
Return to Section TOC Return to Section TOC Return to Section TOC Return to Section TOC
Return to Master TOC Return to Master TOC Return to Master TOC Return to Master TOC