


PRECISION TIG 185
TROUBLESHOOTING & REPAIR
F-50 F-50
Return to Section TOC Return to Section TOC Return to Section TOC Return to Section TOC
Return to Master TOC Return to Master TOC Return to Master TOC Return to Master TOC
REMOVAL PROCEDURE
1. Remove input power to the TIG 185
machine.
2. Using the 3/8” nutdriver remove the case
wrap-around cover.
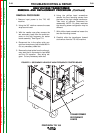
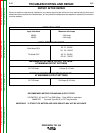
3. With the needle nose pliers remove the
two secondary leads from the quick-con-
nects on the high frequency arc starter
board assembly. See Figure F.11.
4. Disconnect the in-line splice quick con-
nect from one primary lead to lead #231A.
Cut any necessary cable ties.
5. Remove the lead splice from the other pri-
mary lead that is connected to lead #236
and the C4 capacitor. See wiring dia-
gram. Cut any necessary cable ties.
6. Using the phillips head screwdriver
remove the front mounting screws from
the base of the high voltage transformer.
Take note of insulator placement for
reassembly. NOTE: On some machines
the mounting screw configuration may be
different.
7. With phillips head screwdriver loosen the
two rear mounting screws.
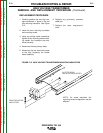
8. Carefully slide the transformer forward
and remove from the TIG 185 machine.
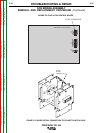
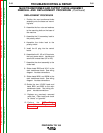
FIGURE F.11 SECONDARY LEADS AT HIGH FREQUENCY STARTER BOARD
TRANSFORMER
SECONDARY
LEADS
HIGH VOLTAGE TRANSFORMER
REMOVAL AND REPLACEMENT PROCEDURE (Continued)
HIGH VOLTAGE TRANSFORMER
REMOVAL AND REPLACEMENT PROCEDURE (Continued)