


PAGE 36 — PS7060 MULTIQUIP SAW • OPERATION MANUAL — REV. #2 (06/02/08)
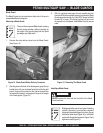
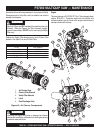
Wheel Drive System
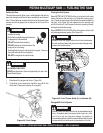
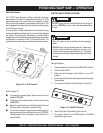
The PS7060 saw features a cable-controlled hydrostatic
transmission with infinite Forward-Neutral-Reverse (F-N-R)
speed adjustment. This is controlled by the operation through
the control handle located on the operator control panel. The
saw is designed with locked axle drive, and can travel at speeds
up to 275 feet per minute.
■
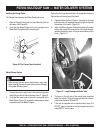
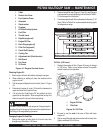
To increase the forward speed, slowly move the control
handle FORWARD.
■
To decrease the forward speed, pull the control handle
BACKWARD.
■
When the control handle is in the Neutral position the saw
will have neither a forward nor reverse motion.
■
As the control handle is passed backward through the
neutral position the saw will start to move in REVERSE.
Reverse speed is also controlled by the position of the
control handle.
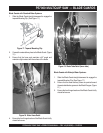
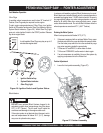
A bi-directional variable displacement transmission pump
powers two hydraulic wheel motors that are directly coupled to
the wheels. The hydrostatic transmission provides vehicle
propulsion in both forward and reverse depending on the position
and direction of movement of the F-N-R control handle. The
hydrostatic transmission also provides dynamic braking action.
Figure 33. F-N-R Control
PS7060 MULTIQUIP SAW — OPERATION
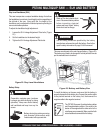
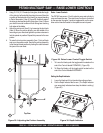
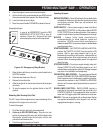
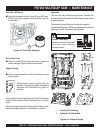
Figure 34. ON/OFF Switch
STARTING AND STOPPING THE ENGINE
DO NOT leave the saw unattended while the engine is
running. NEVER start, park, or leave the saw unattended on
a slope.
WARNINGWARNING
WARNINGWARNING
WARNING
DO NOT stop the engine abruptly when hot. Reduce the
throttle to idle and allow the engine to run one or two
minutes before turning the ignition switch off. This allows
the engine to cool down preventing damage to the Turbo
charger.
CAUTIONCAUTION
CAUTIONCAUTION
CAUTION
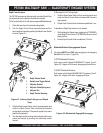
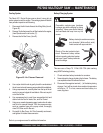
1. Move the speed control handle to the NEUTRAL position.
2. Set the throttle to IDLE.
3. Make sure the Emergency Stop Button is in the OUT
position.
4. Ensure that water lines are attached and water is flowing to
the saw blade.
5. Turn the Ignition Switch to the ON position. (Figure 34.)
Allow the engine to warm up before increasing engine
speed.
Starting the Engine
6. Wait for the Glow Plug Indicator Light to go out.
7. Turn Ignition Switch to the START position; RELEASE
switch after engine starts.
Refer to Figure 33.