


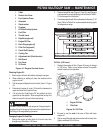

PS7060 MULTIQUIP SAW • OPERATION MANUAL — REV. #2 (06/02/08) — PAGE 49
PS7060 MULTIQUIP SAW — MAINTENANCE
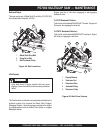
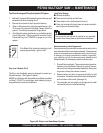
If the Inner Flange does not readily break free
from the tapered Blade Shaft while the center
puller bolt is tightened, lightly tap on the center
puller bolt to allow the flange to break free from
the shaft.
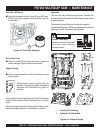
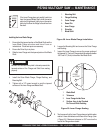
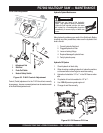
Installing the Inner Blade Flange
1. Ensure that the tapered portion of the Blade Shaft and the
Inner Blade Flange are clean and free of burrs or
indentations. Clean and repair as necessary.
2. Ensure the Drive Key is in place.
3. Slide the Inner Flange onto the tapered portion of the Blade
Shaft.
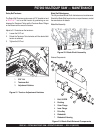
Figure 58. Inner Blade Flange Installation
DO NOT use lubricant of any kind. Lubricant prevents the
tapered surface of the Flange and Shaft from mating
properly.
CAUTIONCAUTION
CAUTIONCAUTION
CAUTION
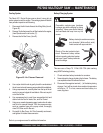
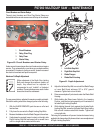
4. Install the Outer Blade Flange, Flange Bushing, and
Mounting Bolt.
5. Tighten with a 1/2" impact wrench to seat the tapered
surfaces of the Inner Flange and Blade Shaft.
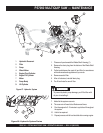
1. Mounting Bolt
2. Flange Bushing
3. Outer Flange
4. Dowel Pin
5. Inner Flange
6. Drive Key
7. Blade Shaft
1
2
3
5
6
7
4
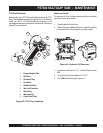
6. Loosen the Mounting Bolt and remove the Outer Flange
and Bushing.
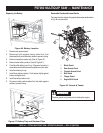
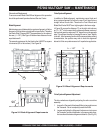
7. Inspect the Inner Flange to ensure the proper seating of
the tapered fit. The Inner Flange should be seated between
.030" and 0.0" (flush) to the end of the Blade Shaft.
1. Blade Shaft
2. Tolerance
3. Inner Flange Inside Face
4. Surface Area to be Checked
For Runout While Rotating
Figure 59. Inner Flange Seating
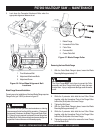
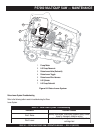
8. Test to ensure that the Inner Flange does not wobble when
rotated. Use a dial indicator on the face of the Flange. (Item
4 Figure 59.) Maximum tolerance is .002" runout on the
face of the Flange when rotated.
1
3
2
4
0.000”
to 0.030”