


Introduction to NAT 80
Models 2603, 2621, and 2635 Getting Started Guide 7 • Security
Introduction to NAT
The basic steps for configuring NAT are:
1. Enable NAT between the internal and external interfaces of the firewall.
2. Create global addresses which will be added to the global pool of IP addresses on the WAN interface.
3. Create a reserved mapping between a global IP address and the IP address of an internal PC.
A Global Address Pool is a pool of addresses seen from the outside network. Each external interface creates a
Global Address Pool with a single address—the address assigned to that interface. For outbound sessions, an
address is picked from a pool by hashing the source IP address for a pool index and then hashing again for an
address index. For inbound sessions, it is necessary to create a reserved mapping.
A reserved mapping is used so that NAT knows where to route packets on inbound sessions. The reserved map-
ping will map a specific global address and port to an inside address and port. Reserved mappings can also be
used so that different inside hosts can share a global address by mapping different ports to different hosts. For
example, Host A is an FTP server and Host B is a web server. By mapping the FTP port to Host A and the
HTTP port to Host B, both insides hosts can share the same global address. Setting the protocol number to
255 (0xFF) means that the mapping will apply to all protocols. Setting the port number to 65535 (0xFFFF) for
TCP or UDP protocols means that the mapping will apply to all port numbers for that protocol.
Some applications embed address and/or port information in the payload of the packet. The most notorious
of these is FTP. For most applications, it is sufficient to create a trigger with address replacement enabled.
However there are three applications for which a specific Application Level Gateway is provided: FTP, Net-
BIOS, and DNS.
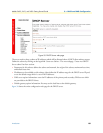
Enabling NAT
The configuration of NAT in this example follows on the preceding configuration completed earlier in this
chapter.
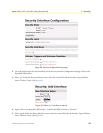
1. Go to the “Security Interface Configuration” page by clicking on Security under Configuration in the
menu.
2. Click on Enable NAT to internal interfaces in the Security Interfaces table. NAT is now enabled between
the internal (LAN) and the external (WAN) interfaces of the firewall.
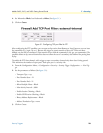
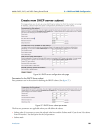
Global address pool and reserved map
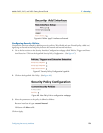
1. Click on Advanced NAT Configuration... on the web page, “Security Interface Configuration.”
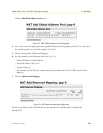
2. Click on the hyperlink Add Global Address Pool... The global IP addresses need to be created and put
into the Global Address Pool.
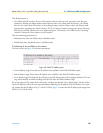
3. Set the parameters to the following values (See figure 53.):
– Interface Type: internal
– Use Subnet Configuration: Use IP Address Range
– IP Address: 100.100.100.101
– Subnet Mask/IP Address 2: 100.100.100.102