


20
Adjustments
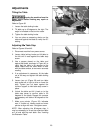
Tilting the Table
Unplug the machine from the
power source before making any repair or
adjustment.
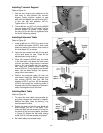
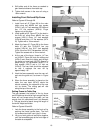
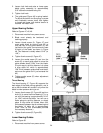
Refer to Figure 39.
1. Loosen the table locking knobs.
2. Tilt table up to 45 degrees to the right. The
angle is indicated on the trunnion scale.
3. Tighten the table locking knobs.
4. You can place a measuring device on the
table and against the blade to verify the 45°
setting.
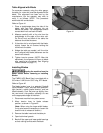
Adjusting 90° Table Stop
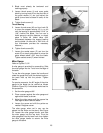
Refer to Figures 39 and 40.
1. Disconnect machine from power source.
2. Loosen table locking knobs and tilt table to
the left until it rests against the table stop
screw.
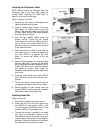
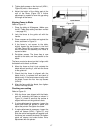
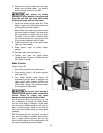
3. Use a square placed on the table and
against the blade, as shown in Figure 40, to
verify that the table is 90 degrees to the
blade. Make sure the table insert is level
with the table surface, to ensure an accurate
reading.
4. If an adjustment is necessary, tilt the table
out of the way and tighten the table locking
knobs.
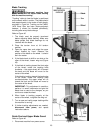
5. Loosen jam nut (Figure 39) and turn table
stop screw left or right to raise or lower the
stop. Tighten jam nut down against the
trunnion support to hold table stop screw in
place.
6. Unlock the table and tilt it back on to the
table stop screw to confirm table is 90
degrees to the blade. Repeat this process
as necessary until table is 90 degrees to the
blade.
7. Make sure pointer (Figure 39) indicates
zero. If it does not, loosen screw and move
pointer to align with zero. Re-tighten screw.
NOTE: After adjusting the 90-degree stop, it
may be necessary to re-set the extension table
so it is level with the main table. See “Leveling
the Extension Table.”
Figure 39
Figure 40