


30
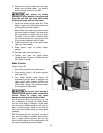
Resawing
Resawing is the process of slicing stock to
reduce its thickness, or to produce boards that
are thinner than the original workpiece, such as
veneers.
The ideal blade for resawing is the widest one
the machine can handle, as the wider the blade
the better it can hold a straight line.
Resawing can be performed using the rip fence
or the resaw guide. When using the rip fence,
use a push block, push stick, or similar device to
keep your hands away from the blade. The
resaw guide offers a pivot point by which you
can carefully follow your layout line; it is
especially useful for sawing curves, when the
fence can’t be used and it’s difficult to control the
cut freehand.
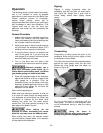
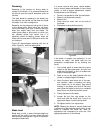
Figure 60 demonstrates resawing with the rip
fence; Figure 61, with the resaw guide.
Figure 60
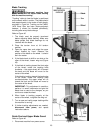
Figure 61
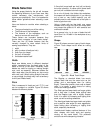
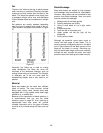
Blade Lead
Blade lead, or drift, is when the blade begins to
wander off the cutting line even when the band
saw rip fence is being used. Figure 62 shows an
example of blade lead.
It is more common with small, narrow blades,
and is almost always attributable to poor blade
quality, or lack of proper adjustments. Inspect
the band saw for the following:
• Fence is not parallel to miter slot and blade.
• Blade is not tensioned correctly.
• Blade is dull.
• Teeth have too much “set” on one side of
the blade.
• Workpiece is being fed too quickly.
Figure 62
If the blade is suspect, but replacing it is not
currently an option, the blade lead can be
temporarily compensated for by skewing the
fence:
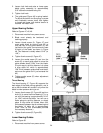
1. Cut a scrap piece of wood about the same
length as the band saw table, and joint one
edge along its length, or rip it on a table saw
to give it a straight edge.
2. Draw a line on the board parallel with the
jointed, or straight edge of the board.
3. Move the band saw fence out of the way,
and carefully make a freehand cut along
your drawn line on the board. Stop about
midway on the board, and shut off the band
saw (allow the blade to come to a complete
stop) but do not allow the board to move.
4. Clamp the board to the table.
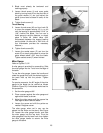
5. Loosen the four hex cap screws on the
fence and slide the fence over, lining it up
against the board. Lock the fence down.
6. Re-tighten the four hex cap screws.
NOTE: Skewing the fence to correct blade lead
is effective for that particular blade; when a new
blade is installed, the fence will need re-
adjustment and re-squaring to miter slot. See
appropriate sections in this manual.