


4 – Installation
iSR6142 Router Installation
SN0051102-00 A 4-5
A
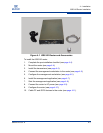
Install the Transceivers
The router supports a variety of SFP transceivers.
To install a transceiver, insert the transceiver into the port and gently press
until it snaps in place.
To remove a transceiver, gently press the transceiver into the port to release
tension, then pull the release tab or lever and remove the transceiver.
Different transceiver manufactures have different release mechanisms.
Consult the documentation of your transceiver.
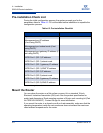
Connect the Management Workstation to the Router
You can manage the router using the SANsurfer Router Manager or the command
line interface (CLI). The SANsurfer Router Manager requires an Ethernet
connection to the router. The CLI can use an Ethernet connection or a serial
connection. Choose the router management method, then connect the
management workstation to the router in one of the following ways:
Indirect Ethernet connection from the management workstation to the router
RJ-45 connector through an Ethernet switch or hub. This requires a 10/100
Base-T straight-through cable.
Direct Ethernet connection from the management workstation to the router
RJ-45 Ethernet connector. This requires a 10/100 Base-T crossover cable.
Serial port connection from the management workstation to the router
RS-232 serial port connector. This requires a 10/100 Base-T
straight-through cable and an RJ45-to-DB9F adapter (included with the
router).
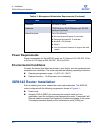
Configure the Management Workstation
The router comes from the factory with a default IP address (10.0.0.1). Prior to
product installation, follow the procedures based on your configuration method:
If you plan to configure the router through the management Ethernet port
(using the GUI or CLI via telnet), you must initially configure the workstation
as described in “Setting the Workstation IP Address” on page 4-6.
If you plan to configure the router using the management COM port,
configure the workstation as described in “Configuring the Workstation
Serial Port” on page 4-6.
NOTE:
The transceiver fits only one way. If the transceiver does not install under
gentle pressure, flip it over and try again.