


i ¸ • :Q • •• :••• • •
know our olnter- maner
.... .... P
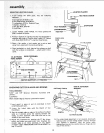
WARNING: F_R" YOUR OWN: SAFETY TURN SWITCH
2
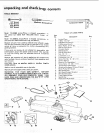
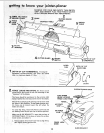
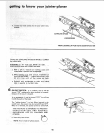
SLIDING GUARD
INFEED
TABLE
SLIDE
BRACKET
CUTTER GUARD 6 ON-OFF
SWITCH
IIII ! _1 L I
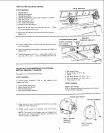
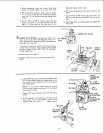
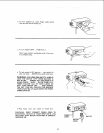
1 11: DEPTH OF CUT HANDWHEEL. Turning the
handwheel counterclockwise Will lower the infeed
_ table to maximum depth of 1/8 in,
I
\
DEPTH OF CUT
HANDWHEEL
|1,, 11 i i
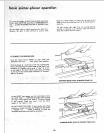
INFEED //_ DEPTH OF CUT
.... _-_-../TABLE/j _ HANDWHEEL
f /
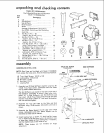
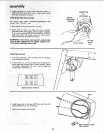
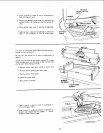
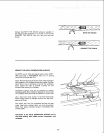
_.. FENCE LOCKS AND STOPS. The fence canbe
moved across the Jointer to take full advantage of the
"sharpness" of the blades.
The:fence should be positioned to the extreme right
(toward pulley) but not beyond the end of the blades.
Mostof the cutting (usually jointing) witl be done with
the fence in this position. As the blades become dull,
the fence can be moved toward the left where the
blades are sharper.
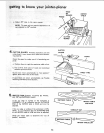
PUSH DOWN
WHEN LOCKING
FENCE LOCK KNOB
FENCE
45°FENCE
STOP
SLIDING GUARD KNOB
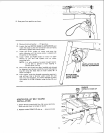
To move the fence, loosen the Fence Lock Knob and
the Sliding Gu_ird Knob and slide to desired position.
Make sure SLIDE BRACKET is even with surface of
OUTFEEDTABLE. If it is above or below the surface,
loosen screws and adjust it.
90° FEN,
STOP
a. Alwavstighten fence Iock knob first to align fence,
then tighten sliding guard knob.
FENCE
KNOB
\
\
1:2 SLIDE BRACKET