


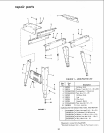

maintenance
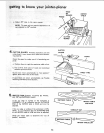
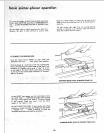
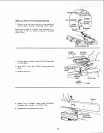
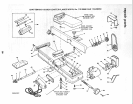
5/32 IN. SETSCREW:
WRENCH
7*: Remove :the six lifter screwsi (Two under each blade.)
8_ C!ean cutterhead,:wedges and screwsthoroughly with
= craftsman Gum and Pitch Rem0ver. A!_o remove the
oil from dew blades,
9; Replace the six lifter screws and screw them in all the
way, but do not tighten. Mark each slot 1, 2, and 3.
This will help you in setting the blades.
CUTTER HEAD i
SETSC REW
MARK SLOTS
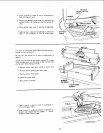
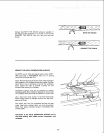
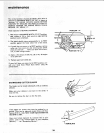
10. Insert a blade in slot marked 1 ... so it projects 1/16
in. beyond endof the Cutterhead.
1"[ ¸.
"Insert a wedge next to blade so the flat side of the
wedge i's again'stthe blade. Pushwedge in manually
do not instal! tw0 locking setscrewsat this time."
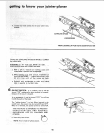
Place:head:of square on outfeed table. LooSen lifter
screws to raise blade until it just touches square and
s ghty raises it: Gently turn cutter head back and
forth with:the pulley while raising blade. The blades
should be adjusted just slightly above the: outfeed
table, by approximately .003 in, (thickness of an
average piece Of paper).
NOTE: Sears has a knife setting gauge for this purpose. Cat.
# 9-2647
1/8 IN. SETSCREW WRENCH
HEAD OF
SQUARE
\
TABLE
LIFTER SCREW
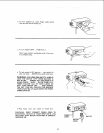
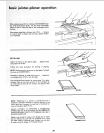
13. "Now install both locking setscrews and tighten (with
the 5/32" setscrew wrench) alternately a little at a
time. Tighten both screws securely. Recheck the blade
to make sure it did not change position."
14; Install other two blades the same way;
22