


Safety instructions
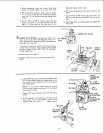
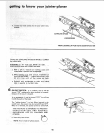
13,:To be sure you will make adepth of cut as planned,
always lower tl_e infeed table slightly beyond the
depth Wanted. then raise the table to the desireddepth.
14. When _aning, jointing, orl beveling wood over four {4)
feet :long, make. sure it is supported at table heig:ht.
15. Never leave the Jointer-Planer work area with the power
on, before the 3ointer-Ptaner has come to a complete
stop; or without removing and storing the switch key.
16, Never operate the Jointer-Planer with protective cover
on the unused shaft end of the motor removed.
WARNING: THE 2" JOINTER-PLANER PULLEY AND
THE 2-1/2" MOTOR PULLEY FURNISHED WILL RUN
THE CUTTER HEAD AT APPROXIMATELY 4300 RPM
WHEN USED WITH A 3450 RPM MOTOR, NEVER
SUBSTITUTE OTHER PULLEYS TO INCREASE THIS
SPEED BECAUSE tT COULD BE DANGEROUS
WARNING: DO NOT ALLOW FAMILIARITY (GAINED
FROM FREQUENT USE OF YOUR JOINTER-PLANER)
for iointer-pQaner
TO BECOME COMMONPLACE. ALWAYS REMEMBER
THAT A CARELESS FRACTION OF A SECOND 1S
SUFFICIENT TO INFLICT SEVERE INJURY.
t 7. Readand followthe instructions appearing on the danger
ta_! on the cutter guard.
4,
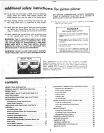
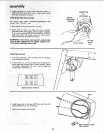
DANGER
FOR YOUR OWN SAFETY
READ AND FOLLOW SAFETY iNSTRUCTIONS IN
OWNERS MANUAL BEFORE OPERATING THiS MA-
CHIME,
NEVER OPERATE THIS MACHINE WITH THE CUT-
TER GUARD, SLIDING GUARD OR BELT GUARDS
REMOVED.
NEVER MAKE JOtNTtNG OR PLANING CUTS DEEP-
ER THAN 1!16iNCH.
ALWAYS USE HOLD DOWN/PUSH BLOCKS FOR
JOINTII_G MATERIAL NARROWER THAN 3 INCHES
OR PLANING MATERIAL THINNERTHAN 3 INCHES,
WEAR YOUR
The operat:_or_ of arw power tDo! car_ result in foreign
objects being thrown into the eyes, which can result in
severe eye damage. Always wear safety goggles complying
with ANS_i Z87.1 (shown on Package) before commencing
power tool operation. Safety Goggles are available at Sears
reta_| o'rr catalog storeS.
J J UJJ/L i J] ........
POWER TOOL GUARANTEE ................... Z
GENERAL SAFETY INSTRUCTIONS FOR
POWER TOOLS .... ........................... 2
ADDITIONAL SAF ETY INSTR UCTIONS FOR
JOINTER-PLANER ............................ 3
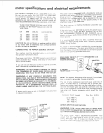
MOTOR SPECIFICATIONS AND ELECTRICAL
REQUIREMENTS _. ........ ................... 5;
Connecting to Power Source Outlet .............. 5
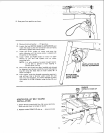
Check Motor Rotation ........................ 5
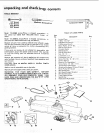
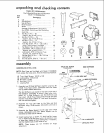
UNPACKING AND CHECKING CONTENTS ........ B
ASSEMBLY ..................... ; ............ 7
Assembling Steel Legs ; ._ ................... 7
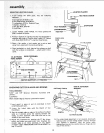
Mounting Jointer-Ptaner On Recommended
: Checking Cutterblade Sci;ews:..: :.. ;,.:.. : ;., 8
Installing Sliding Guard;. _..... q;::o:'_:::...:, : ;i .. E_
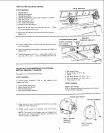
..... Mounting Recommended Craftsman M0torl and
i Belt Guards ........ 9
Check Motor Rotation.. ..... :....... . .. ;, . .... . 10
Jointer-Pulley Belt Guard Instaiiation _ :,::. i. ..... 11
4
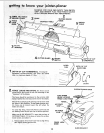
GETTING TO KNOW YOUR JOINTER-PLANER .... 12
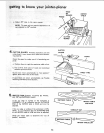
Depth of Cut Handwhee! ...................... 12
Fence Locks and Stops ....................... 12
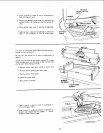
Fence Tilt Scale ............................. 13
Cutter Guard ............................... 14
Fnfeed Table ............................... 14
On-Off Switch .............................. 16
BAS_IC JOINTER-PLANER OPERATION ........... 18
Feeding the Workpiece ....................... 18
Using the Hold Down/Push Blocks .............. 19
Beveling ................................... 20
MAINTENANCE .............................. 21
Replacing Cutter Blades ....................... 21
Ir_stalting Cutter Guard Spring .................. 23
Sharpening Cutter Blades ...................... 24
GENERAL MAINTENANCE .................... 25
WIRING DIAGRAM ........................... 25
LUBRICATION ............................... 25
T_OUBLE SHOOTING ......................... 26
RECOMMENDED ACCESSORIES ................ 26
REPAIR PARTS .............................. 27