


-24-
Df[\cN(/(0&N(/)'D]^%J`eZ\()&('
J<KLG
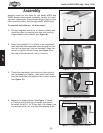
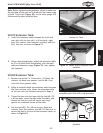
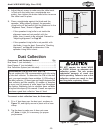
('%Install the front rail onto the table and extension
wings with four M8-1.25 x 40 hex bolts, eight 8mm
flat washers, four 8mm lock washers, and four
M8-1.25 hex nuts, as shown in =`^li\(-.
Before final tightening, make sure the front rail is
set
3
⁄16" below the beveled edge along the entire
length of the table.
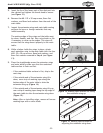
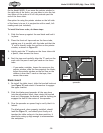
()% Attach the rear rail to the holes on the main table
using two M8-1.25 x 30 hex bolts, 8mm lock washers
and 8mm flat washers, as shown in =`^li\ (0.
(*% Secure the rear rail to the extension wings with two
M8-1.25 x 40 hex bolts, four 8mm flat washers, two
8mm lock washers and two M8-1.25 hex nuts.
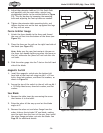
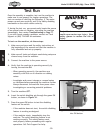
((% N(/(0FECP: Install the 62" front rail tube onto the
50" front rail with the three M6-1 x 16 cap screws,
6mm flat washers, and 6mm lock washers, as shown
in =`^li\(..
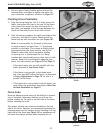
N(/)'FECP1Install the 82" front rail tube onto the
70" front rail with five M6-1 x 16 cap screws, 6mm
lock washers, and 6mm flat washers, as shown in
=`^li\(/.
=`^li\(-% Front rail installed (W1819).
=`^li\(.% Model W1819 tube attached to
front rail.
x3
=`^li\(/% Model W1820 tube attached to
front rail.
x5
=`^li\(0% Rear rail installed (W1820).
x2
Rail Tube
Rail Tube