


41
Super Finish 7000
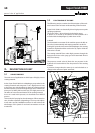
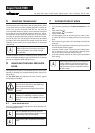
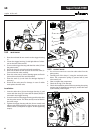
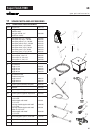
Insertion lter in Airless spray gun
1
3
2
GB
c lean Ing the un It / s erv IcIng
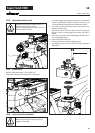
8.4 CLEANING THE AIRLESS SPRAY GUN
1. Rinse the Airless spray gun with a suitable cleaning agent
under lower operating pressure.
2. Clean the tip thoroughly with a suitable cleaning agent
so that no suitable coating material rests remain.
Do not use sharp objects to clean the nozzle.
3. Clean the outside of the Airless spray gun thoroughly.
Removal
1. Pull the protective bracket (1) forwards.
2. Screw the grip (2) out of the gun housing. Pull out the in-
sertion lter (3).
3. If the insertion lter is clogged or defective, replace it.
Installation
1. Slide the insertion lter (3) with the longer cone into the
gun housing.
2. Screw the grip (2) into the gun housing and tighten it.
3. Latch in the protective bracket (1).
9.1 GENERAL SERVICING
An annual expert check is highly recom-
mended to be sure to have a safe unit.
You can servicing of the unit carried out by
the Wagner Service. Favourable conditions
can be agreed with a service agreement and/
or maintenance packages.
Minimum check before every startup:
1. Check the high-pressure hose, spray gun with rotary joint,
power supply cable with plug for damage.
2. Check whether the pressure gauge can be read.
Check at periodical intervals:
1. Check inlet-, outlet-, relief valve according wear. Clean it
and replace worn out parts.
2. Check all lter inserts (spray gun, suction system) clean it
and replace if necessary.
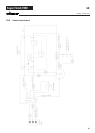
9 SERVICING
9.2 HIGHPRESSURE HOSE
Inspect the high-pressure hose visually for any notches or
bulges, in particular at the transition in the ttings. It must be
possible to turn the union nuts freely. A conductivity of less
than 1 MΩ must exist across the entire length.
Have all the electric tests carried by the Wag-
ner Service.
10 REPAIRS AT THE UNIT
Switch the unit o.
Before all repair work: Unplug the power
plug from the outlet.
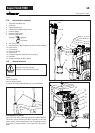
10.1 INLET VALVE PUSHER
1. Use a 17 mm spanner to screw out the inlet valve button.
2. Replace the wiper (1) and O-ring (2).