


12 Operation
MAN0155 (Rev. 2/16/2007)
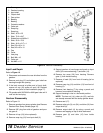
8. Attach quick couplers to tractor hydraulic source.
9. Place jack stand in storage position.
OPERATING TECHNIQUE
1. Power for operating the stump grinder is supplied
by the tractor PTO. Know how to stop the tractor
and stump grinder quickly in an emergency.
2. Position stump grinder above stump to be
removed. Engage PTO at low engine rpm to
minimize stress on the drive system and gearbox.
With PTO engaged, increase PTO speed to 540
rpm and maintain throughout grinding operation.
3. Lower tractor 3-point arm until pads on stump
grinder are firmly on the ground.
4. Activate top cylinder to lower the cutting wheel onto
the stump to desired depth.
NOTE: The amount of material removed may vary
depending on tractor size and hardness of wood.
5. Start cutting wheel on left edge of stump and slowly
activate side cylinder to begin grinding. Cutting
wheel can pivot 55-degrees from side to side.
6. With pass across stump completed, activate side
cylinder to the left, lower top cylinder to remove
more material, and activate side cylinder to the
right. Continue this process until stump is removed.
NOTE: If stump is too large to remove in one pass,
reposition tractor and start operating procedures over.
NOTICE
■ Top cylinder must be completely raised to
avoid driveline damage before raising 3-point lower
lift arms.
When finished grinding stump, disengage PTO, raise
top cylinder, and raise stump grinder off the ground
with the 3-point lower lift arms.
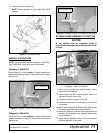
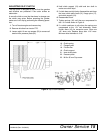
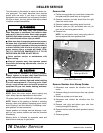
STORE STUMP GRINDER
1. Raise stump grinder with 3-point lower lift arms.
2. Remove lynch pin from jack stand.
3. Lower jack stand and align top hole in jack stand
tube with hole in jack stand support bracket.
4. Insert lynch pin to secure jack stand into position.
5. Lower stump grinder with 3-point lower lift arms to
the ground and top cylinder until all three pads are
securely on the ground.
Figure 7. Stump Grinder in Storage Position
CLEANING
After Each Use
● Remove large debris such as clumps of dirt, grass,
crop residue, etc. from machine.
● Inspect machine and replace worn or damaged
parts.
● Replace any safety decals that are missing or not
readable.
Periodically or Before Extended Storage
● Clean large debris such as clumps of dirt, grass,
crop residue, etc. from machine.
● Remove the remainder using a low-pressure water
spray.
1. Be careful when spraying near scratched or torn
safety decals or near edges of decals as water
spray can peel decal off surface.
2. Be careful when spraying near chipped or
scratched paint as water spray can lift paint.
3. If a pressure washer is used, follow the advice
of the pressure washer manufacturer.
● Inspect machine and replace worn or damaged
parts.
● Sand down scratches and the edges of areas of
missing paint and coat with Woods spray paint of
matching color (purchase from your Woods
dealer).
● Replace any safety decals that are missing or not
readable (supplied free by your Woods dealer).
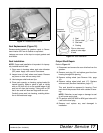
See Safety Decals section for location drawing.
DP1
LYNCH PIN