


18 Dealer Service
MAN0155 (Rev. 2/16/2007)
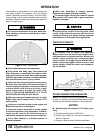
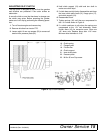
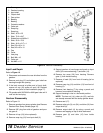
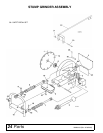
Figure 13. Gearbox Disassembly
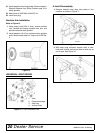
Input Leak Repair
Refer to Figure 13.
1. Disconnect and remove the rear driveline from the
gearbox.
2. Remove vent plug (21) and siphon gear lube from
housing through this opening.
3. If the leak occurred at either end of input shaft,
remove oil cap (19) and/or oil seal (18). Replace
with new one (refer to Seal Installation, page 17).
4. Fill gearbox with SAE 80W or 90W gear lube until it
runs out the level plug.
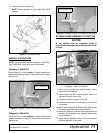
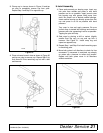
Gearbox Disassembly
Refer to Figure 13.
1. Remove gearbox from stump grinder (see Remove
Gearbox from Stump Grinder, page 16).
2. Remove 3/8" plug from side of gearbox and pour
out gear oil.
3. Remove oil cap (19) (to be replaced).
4. Remove snap ring (10) from input shaft (3).
5. Support gearbox in hand press and push on input
shaft (3) to remove bearing (7) and shim (12).
6. Remove top cover (20) from housing. Remove
gear (1) from inside housing.
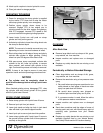
7. Remove oil seal (18) from front of housing (to be
replaced).
8. Remove snap ring (10) and shim (13) from front of
housing (2).
9. Remove front bearing (7) by using a punch and
hammer from outside of housing.
10. Support housing in vise in a horizontal position.
NOTE: The hex nut (14), cotter pin (23), and hub
are already removed with the stump grinder wheel.
11. Remove seal (17).
12. Remove cotter pin (9), nut (24), and shim (16) from
output shaft (4).
13. Remove output shaft (4) by using a punch and
hammer and tapping on top to drive downward.
14. Remove gear (5) and shim (15) from inside
housing.
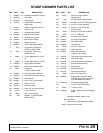
1. Crown gear
2. Gearbox housing
3. Input shaft
4. Output shaft
5. Gear pinion
6. Bearing
7. Bearing
8. Protective washer
9. Cotter pin
10. Snap ring
11. Snap ring
12. Shim, 45.3 x 2.5
13. Shim, 70.3 x 84.7
14. Slotted hex nut M30 x 2
15. Shim, 50.3 x 70.3
16. Shim, 40.3 x 61.7 x 1
17. Seal, 50 x 90 x 10
18. Seal, 45 x 85 x 10
19. Cap
20. Cover
21. Vent plug
22. Bolt, M8 x 16
23. Cotter pin
24. Nut M40 x 1.5