


975-0697-01-01 31
Installing the Inverter/Charger
This guide for use by qualified personnel only.
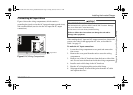
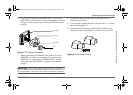
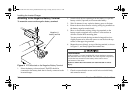
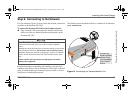
6. Connect one connector on the NEGATIVE (–) cable to the
NEGATIVE (–) DC terminal on the inverter/charger, as shown
in Figure 7. The connector goes on first, then the lock washer
and bolt.
7. Before proceeding, check that the cable polarity is correct:
POSITIVE (+) on the inverter/charger is connected to the
POSITIVE (+) on the battery, and NEGATIVE (–) cable is
connected to the NEGATIVE (–) terminal on the inverter/
charger.
8. Connect the other end of the cable to the NEGATIVE (–)
terminal on the battery.
9. Use a wrench to tighten the bolt to a torque of 20.4–21.7 Nm at
the inverter/charger end.
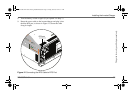
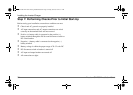
10. To protect the DC terminals, attach the DC terminal covers
(Figure 8) to the inverter/charger, using the screws provided.
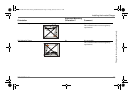
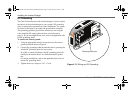
Figure 7 DC Cable Connections
IMPORTANT:
The next step is the last cable connection you need to
make. A spark is normal when the DC disconnect switch is turned on or the
DC circuit breaker is closed so be sure step #3 is done before proceeding.
connector
lock washer
bolt
DC terminal
Figure 8 DC Terminal Covers
Freedom SW 3K2K 230V InvChg Install Guide.book Page 31 Friday, June 20, 2014 9:11 AM