


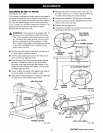

ALIGN RIVING KNIFE TO BLADE
See Figures 26A - 26C.
When ripping the riving knife must be centered with
the blade to ride in the middle of the kerf and keep it
from binding. Binding pinches the blade. Blade
pinching can cause kickback.
There are two pairs of anti-kickback pawls.
,_!1 WARNING: Failure to use the riving knife, hold
downs, and anti-kickback pawls can allow
kickback. Kickback can throw the workpiece
toward the operator, resulting in serious injury.
• Put the blade to the in-rip position by first loosening
the yoke lock handle, below the carriage on the
right. Then pull the yoke pivot latch (right side of
arm, on carriage) forward and rotate the yoke to the
left. This indexes the yoke 90° so the blade is
between the motor and the column. Lock the yoke
lock handle.
• With the elevating handwheel, lower the arm until
the blade just clears the table.
• Support the lower outer blade guard and loosen the
carriage lock knob on the left of the arm. Move the
yoke back until the blade touches the fence. Reset
the carriage lock knob.
• Loosen the riving knife knob, at the front of the
upper blade guard. Lower the riving knife to the
table and tighten the knob. tf the knife rests against
the fence, with one set of pawls riding on the fence,
no adjustment is needed.
• If the riving knife is on the fence or not touching it,
loosen the riving knife slotted nut (just above the
pawls, to the right). Correct the riving knife position
and retighten the cap nut.
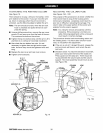
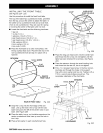
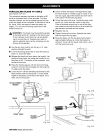
CARRIAGELOCK KNOB YOKELOCKHANDLE
RIVINGKNIFE
KNOB
RIVINGKNIFE
SLOTTEDNUT
RIVINGKNIFETOO
FARRIGHTOF FENCE
AND BLADE
Fig. 26A
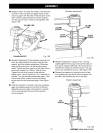
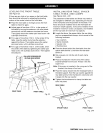
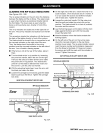
LOWEROUTER
BLADEGUARD
RIVINGKNIFE
ANTI-KICKPAWLS
BLADEGUARD
.3KPAWLS
FRONTTABLE
FENCE
CORRECTALIGNMENTOFTHERIVINGKNIFE
ANDANTI-KICKPAWLS
Fig. 26C
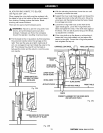
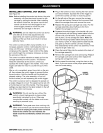
RIVINGKNIFEONTOPOFFENCE
TOOFARLEFTOFBLADE
Fig. 26B
33
rRRFTSMRN°RADIALSAW315.273731