


Receiver
®
4. Click the trigger one time.
5. The receiver will beep. During the beep, pull in the trigger and hold it.
6. Continue to hold the trigger and watch the countdown (from 5 to 0) displayed in the bottom window.
This countdown is accompanied by a chirping sound.
7. When the countdown reaches zero, let go of the trigger.
8. A good calibration will be confirmed by 3 short beeps. Two long tones indicate a failed calibration,
which may be due to an inadequate signal from the transmitter or interference.
9. The bottom window should display 120 inches (±2 inches) or 297 cm (±5 cm).
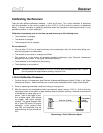
10. Using a tape measure for precise positioning, as in step 3, move the receiver to at least two other
locations (e.g., 60 inches [152 cm] and 240 inches [610 cm]) and confirm proper depth/distance
readings. Verify that your target drilling depth displays accurately.
11. Note the signal strength for possible later use.
Confirming Proper Calibration
Check the calibration using a tape measure with the transmitter above ground in the housing. Place the
receiver parallel to the housing at a series of accurately measured distances, and verify that the distance
displayed in the bottom window corresponds to the distance on the tape measure. If there is a consider-
able discrepancy between the measured distance and that displayed on the receiver (greater than ±5%),
then recalibrate.
2-Point Calibration Procedure
A 2-point calibration is used when the transmitter is below ground. It is recommended that more than one
2-point calibration procedure be conducted to verify a good calibration. Two procedures are given
below—one for newer receivers and one for older receivers (manufactured before 1995 and never
upgraded).
To calibrate (newer receivers):
1. Confirm the lack of background interference by first waiting for the transmitter to fall asleep (10–15
minutes). An acceptable background interference should show a signal strength of less than 150
points (in the top left window with the trigger held in). Make sure that there are no other active
transmitters within range of the receiver. (See “Electrical Interference/Background Noise Check” in
the Signal Interference Section.)
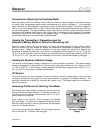
2. Turn on the transmitter if it is still asleep by rotating the drill string. Position the receiver parallel to
and directly over the transmitter; the transmitter’s pitch must be less than 20%. The ground surface
under the receiver must be relatively solid, flat, and level. The receiver should be displaying pitch,
roll, and distance.
3. Hold the receiver level, directly above the transmitter, and at least 12 inches (30 cm) above ground.
4. Click the trigger; you will hear a tone.
14 DigiTrak
®
Mark III Operator’s Manual