


®
Locating
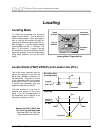
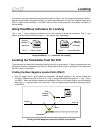
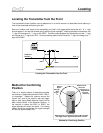
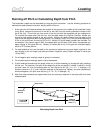
Locating the Transmitter from the Front
The transmitter’s three locations can be determined in a similar manner as described above starting in
front of the transmitter while facing the drill.
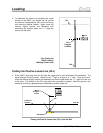
Start at a location well ahead of the transmitter and hold in the trigger while facing the drill. A “+” sign
should appear in the top left window (along with the signal strength). Walking toward the transmitter, the
“+” sign will change to a “–” sign at the FNLP. Continue walking toward the transmitter and the “–” sign
will change to a “+” sign at the PLL. Continue walking toward the drill and the “+” sign will change to a “–”
sign at the RNLP.
FNLP
RNLP
PLL
Surface of
Ground
Transmitter
Drill
Locating the Transmitter from the Front
653
I
27
22
+
~
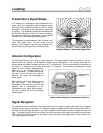
Observe
Signal
Strength
With
Trigger
In
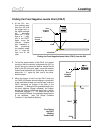
Rotate Around
Axis Point
(Plumb Line Is
Perpendicular
to Page at
this Point)
When Receiver is rotated about axis at FNLP or RNLP
with trigger held in, signal should remain constant.
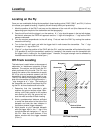
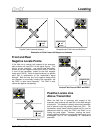
Method for Confirming Position
Method for Confirming
Position
There is a simple method to determine whether
the
receiver is positioned above the FNLP, RNLP,
or transmitter. Rotate the receiver around the
“plumb line” axis of the receiver with the trigger
held in (see “Using Depth Antenna Plumb Line to
Mark Locate Points” in the Receiver Section). If
the receiver is above the FNLP or RNLP, the
signal strength will remain the same. If it is being
rotated above the transmitter, the signal strength
will vary by approximately 50%.
DigiTrak
®
Mark III Operator’s Manual 49