


Locating
®
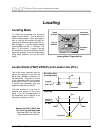
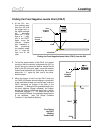
Locating on the Fly
Once you are comfortable finding the transmitter’s three locating points (FNLP, RNLP, and PLL) it is time
to increase your speed at locating. Hopefully this will directly affect your productivity!
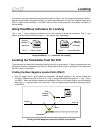
1. Mark the position of the FNLP and pace out the distance of the next drill rod (this distance will vary
depending upon the pitch of the transmitter and the topography).
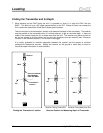
2. Face the drill and hold the trigger in on the receiver. A “+” sign should appear in the top left window.
As the tool advances, the FNLP will approach and the “+” sign will change to a “–” sign as the FNLP
passes underneath.
3. Turn the receiver perpendicular to the drill string. Find and mark the FNLP by moving the receiver
across the drill string.
4. Turn to face the drill again and with the trigger held in walk toward the transmitter. The “–” sign
changes to a “+” sign at the PLL.
5. “Sight in” or align the position of the FNLP with the PLL, and the transmitter will be below this point.
(It is possible to verify the transmitter’s position by “sweeping” the receiver over the transmitter with
the trigger held in looking for the highest signal. However, the signal strength can be affected by
interference and should not be relied upon.)
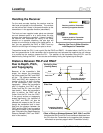
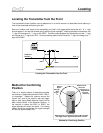
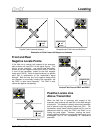
Off-Track Locating
PLL
Drill
Obstruction
Path to Follow
Around Obstruction
Borepath
FNLP
RNLP
Predetermined
Distance
Point 1
Po
i
nt
2
Point 3
Off-Track Locating
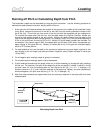
This technique is useful when an aboveground
obstruction or interference prevents a direct
walkover. The receiver can still track the PLL
when positioned off to the side. The PLL runs
through the center of the transmitter at exactly
90° to its axis and extends outward until the
transmitter’s signal becomes too weak to use.
The PLL can be found by stepping off to either
side of the transmitter and finding where the “–
” sign changes to a “+” sign. The heading of
the transmitter can also be confirmed by find-
ing the PLL at three locations off to the side.
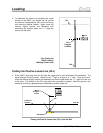
1. Determine that the transmitter’s pitch
matches the ground surface slope. Main-
taining a drill pitch parallel to the surface
and working on fairly flat ground will en-
sure the most accurate off-track locating.
2. Walk a predetermined distance sufficient
to avoid the obstruction to the side of the
borepath and note the slant distance in
the bottom window (trigger released).
3. Walk parallel to your intended borepath
with the trigger held in; the “–” sign in the
top left window will change to a “+” sign at
the PLL. Note the slant distance in the
bottom window with the trigger released
(Point 1).
50 DigiTrak
®
Mark III Operator’s Manual