


Maintenance
309298J 25
Flush the Spray Gun
1. Relieve the pressure.
2. Be sure the turbine air (TA) is turned off.
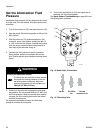
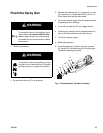
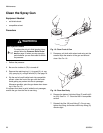
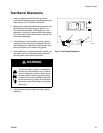
3. Remove the retaining ring (1), tip guard (3), air cap
(40), spray tip (4), and gun shroud (2). See F
IG. 14..
Clean these parts and set them aside.
4. Turn on the solvent supply. Use the lowest possible
fluid pressure when flushing.
5. Turn on the cylinder air (CYL) to trigger the gun.
6. Flush the gun, spraying into a grounded metal con-
tainer until clean solvent comes from the gun.
7. Turn off the solvent supply.
8. Relieve the pressure.
9. Install the spray tip (4) and air cap (40), tip guard
(3), shroud (2), and retaining ring (1) onto the gun.
Tighten the retaining ring firmly.
Fig. 14. Remove Spray Tip Before Flushing
WARNING
Skin Injection Hazard
To reduce the risk of a fluid injection injury,
always follow the Pressure Relief Proce-
dure on page 18 when you stop spraying
and whenever you are instructed to relieve
the pressure.
WARNING
Fire, Explosion, and Electric Shock Hazard
To reduce the risk of fire, explosion, or elec-
tric shock, turn off the turbine air (TA) before
flushing the gun or any part of the system.
TI1723A
40
3
1a
1
2
4
4a