


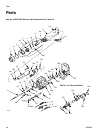


Repair
309298J 43
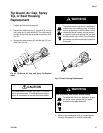
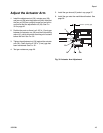
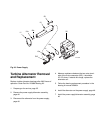
Adjust the Actuator Arm
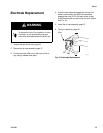
1. Install the adjustment nut (30), actuator arm (29),
and jam nut (28) onto the piston rod (34b). Note that
the jam nut (28) has a slightly larger hex and a thin-
ner profile than the adjustment nut (30). See F
IG.
30. on page 42.
2. Position the parts so there is a 0.125 in. (3 mm) gap
between the actuator arm (29) and the fluid packing
rod nut (U), which allows the atomizing air to actuate
before the fluid. See F
IG. 32..
3. Tighten the adjustment nut (30) against the actuator
arm (29). Check that the 0.125 in. (3 mm) gap has
been maintained. See F
IG. 32..
4. Test gun resistance, page 29.
5. Install the gun shroud (2) and air cap, page 37.
6. Install the gun onto the manifold and bracket. See
page 36.
Fig. 32. Actuator Arm Adjustment
TI1567A
28
29
30
34b
U
0.125 in. (3 mm) gap