


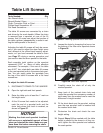
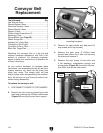

-28-
G0459 12" Drum Sander
Tools Needed: Qty
Wrench 19mm ...................................................
1
Phillips Head Screwdriver #2 ............................
1
Tensioning
The conveyor may slightly stretch with continued
use and will eventually need to be tensioned. This
is most obvious if the conveyor starts slipping on
the rollers.
When you tension the conveyor, focus on ten
-
sioning the adjustment bolts in even increments.
Tensioning one side more than the other will
cause tracking problems, which will require you to
take additional steps to get the sander operating
correctly.
To tension the conveyor:
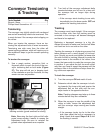
1. Use a magic marker, correction fluid, or
fingernail polish to mark the front of the con
-
veyor tensioning bolt on both sides (
Figure
27). This step will aid you in keeping track
of the rotations as you turn the bolts, so they
remain as even as possible.
Conveyor Tensioning
& Tracking
2. Turn both of the conveyor adjustment bolts
counterclockwise one full turn at a time until
the conveyor belt no longer slips during
operation.
—If the conveyor starts tracking to one side,
immediately turn the drum sander
OFF and
perform the tracking instructions.
Tracking
The conveyor must track straight. If the conveyor
tracks to either side, then the tracking must be
corrected or the conveyor will become damaged
and have to be replaced.
Replacing a damaged conveyor is a big job.
Always be careful to make sure that the belt does
not travel too far to one side or the other.
Tracking the conveyor is a balancing process that
takes patience and a small degree of trial-and-
error. Usually you must over-tighten the loose side
(the side the belt is tracking towards) to make the
conveyor move to the middle of the rollers, then
loosen that same side to make the conveyor stay
in position. If you adjust the bolt too much either
way, then you have to repeat the process until the
conveyor rides in the middle and stays there dur
-
ing continuous operation.
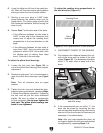
To track the conveyor:
1. Turn the conveyor ON and watch it track.
2. Determine which side the conveyor is track-
ing towards (the loose side) and tension the
adjustment bolt on that side until the con
-
veyor tracks in the opposite direction.
Note: Tracking changes may take up to three
minutes before they are noticeable.
3. When the conveyor is near the middle of the
rollers or table, loosen the adjustment bolt
until the conveyor stops moving and tracks
straight.
—If the conveyor tracks too far to the other
side, then adjust the bolt as necessary to
bring it back and repeat Steps 2 & 3 until
the tracking is correct.
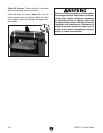
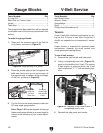
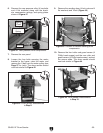
Figure 27. One side of conveyor tensioning &
tracking controls (guard removed for clarity)
.
Adjustment
Bolt
Note: Removing the front right and left roller
guard covers makes it easier to access the
adjustment bolts. Be sure to reinstall the
guards when adjustments are complete.