


G1015 Knife Belt Sander/Buffer -16-
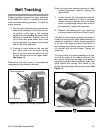
Figure 15. Relieving edges of drive wheel.
Belt Tracking
Proper angulation between the upper and lower
drive wheels will result in a sanding belt which
remains centered during operation. To adjust for
proper tracking:
1. Turn the drive wheel several revolutions by
hand. If the belt begins to shift from its cen-
ter position to the right or left, tracking
adjustment will be needed. Be careful when
adjusting to make sure the belt does not
run off the lower drive wheel and hit the
mounting bracket. The edge of the sanding
belt can be easily damaged.
2. Continue to hand rotate the belt and with
your other hand, turn the large tracking
knob at the top of the arm right or left until
the belt centers itself on the upper wheel.
See Figure 14.
If the belt will not track properly, it is possible that
realignment of the wheels is required.
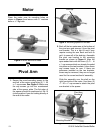
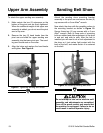
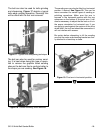
Figure 14. Upper arm tracking adjustments.
Tracking Knob
Wheel Adjustment
Belt Tension
Knob
Since the lower drive wheel positioning is fixed,
tracking adjustment requires aligning the
upper wheel:
1. Loosen the two (2) setscrews and slide the
upper wheel shaft in or out until it is approx-
imately the same distance out as the lower
wheel. A straightedge can be used to aid in
this alignment. Tighten the setscrews.
2. Reinstall the sanding belt and repeat the
tracking procedure outlined in Steps 1 and 2.
If the belt is still not staying properly positioned, it
could be that the entire upper head assembly is
rotated out of position. Loosen the two setscrews
at the top of the upper arm post. Sight down on
the assembly and visually align the top wheel so
it is parallel with the drive wheel. Tighten the
setscrews.
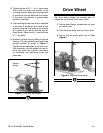
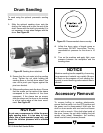
The final solution to tracking problems is to light-
ly bevel the edge of the rubber surface of the
drive wheel. Sometimes the edge of the wheel is
raised just enough to cause problems. Use a rasp
lightly against the running drive wheel to just
slightly relieve the edge of the wheel surface. See
Figure 15.