


G5959Z 12" Left-Tilting Table Saw -13-
Most of your Model G5959Z has been assembled
at the factory, but some parts must be assembled
or installed after delivery. We have organized the
assembly process into steps. Please follow along
in the order presented here.
TOOLS REQUIRED: You will need a high quality
square, a long straightedge, 10mm, 12mm, 14mm
open end wrenches and a 3mm hex wrench.
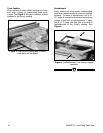
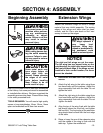
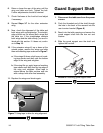
Extension Wings
Inspect the extension wings for burrs or foreign
material that may inhibit assembly. The mating
edges of the wings and table must be clean,
smooth, and flat. Use a wire brush or file if nec-
essary to clean up the edges.
1. Disconnect the table saw from the power
source.
2. Attach the left wing to the table using three
hex head bolts and flat washers. Adjust the
wing reasonably flush with the table. Do not
tighten the bolts.
3. Attach the right wing to the table using three
hex head bolts and flat washers. Adjust the
wing reasonably flush with the table. Do not
tighten the bolts.
4. Align the top of the wing flush with the table
top directly above the front bolt, and tighten
the front bolt. The front edge of the extension
wing should also be flush with the front edge
of the table.
5. Raise or lower the rear of the extension wing
until the middle of the wing is flush with the
table top. Tighten the middle bolt.
NOTICE
The right and left wings are not the same.
The left wing has two tapped holes on the
outside edge, the right has a tapped hole on
the front and back edge. If the wings are not
installed in their correct location, the fence
cannot be attached.
The wings represent a
very heavy load.
Improper lifting tech-
niques or inadequate lift-
ing assistance could
result in serious injuries.
Disconnect power to the
machine when perform-
ing any maintenance,
assembly or adjust-
ments. Failure to do this
may result in serious
personal injury.
!
Wear safety glasses dur-
ing the entire assembly
process. Failure to com-
ply may result in serious
personal injury.
Some metal parts may
have sharp edges on
them after they are
formed. Please examine
the edges of all metal
parts before handling
them. Failure to do so
could result in injury.
Beginning Assembly
SECTION 4: ASSEMBLY