


-20- G5959Z 12" Left-Tilting Table Saw
Figure 22. Measuring for parallelism.
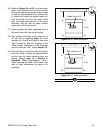
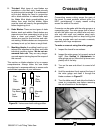
Figure 23. Table mounting bolt holes.
Table Mount Holes
5. If the gap between the blade and the
adjustable square is greater than .004",
loosen the table mounting bolts shown in
Figure 23 and adjust the table. Note—If you
dont have a .004" feeler gauge to measure
the gap, a dollar bill is approximately .004".
6. Repeat steps 2-6 until the miter slot is paral-
lel to the blade.
7. Tilt the blade to 45° and repeat steps 1-5. If
the blade is still parallel to the miter slot, con-
tinue on to the “Miter Gauge” instructions.
Otherwise, continue with the next step.
8. If the blade was parallel to the miter slot at
90° but not at 45°, the table will need to be
shimmed with metal shim stock. The shims
are placed under the table over each of the
four table mount holes shown in Figure 23.
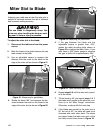
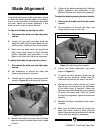
Miter Slot to Blade
Adjusting your table saw so that the miter slot is
parallel to the blade reduces the risk of kickback
and increases cutting accuracy.
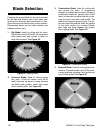
Figure 21. Measuring for parallelism.
The saw blade is dangerously sharp. Use
extra care when handling the blade or work-
ing near it. Serious injury is possible.
!
!
!
To adjust the miter slot to the blade:
1. Disconnect the table saw from the power
source.
2. Mark the blade in the gullet between the two
teeth closest to the table.
3. Use an adjustable square to measure the
distance from the mark on the blade to the
edge of the miter slot as shown in Figure 21.
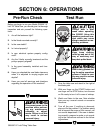
4. Rotate the blade 180° and measure the dis-
tance between the mark on the blade to the
edge of the miter slot as shown in Figure 22.