


Model T10687 (Mfg. Since 10/12)
-17-
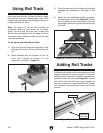
4. Once the arbor bolt has been loosened, use
your fingers to carefully remove it, along with
the arbor washer, then guide the blade down
and out of the saw.
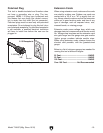
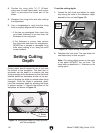
Figure 10. Loosening arbor bolt.
3. With your free hand, turn the arbor bolt
counterclockwise with a 5mm hex wrench to
loosen it, as shown in Figure 10.
5.
When ready to insert a new blade, lower the
saw back down so that the arbor flange is
visible. Insert a new blade into the saw. Align
the center of the blade over the arbor flange
and let it rest there.
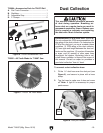
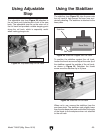
6.
Make sure grooves of arbor washer are cor-
rectly lined up with the flange. Thread the
arbor bolt and washer into place with your
free hand. The correct order of installation is
shown below in Figure 11 for your reference.
Figure 11. Saw blade and blade-fastening
components.
Blade
Washer
Arbor
Bolt
Arbor Flange
7. Engage the blade lock to keep the arbor
flange steady, and tighten the arbor bolt
firmly using a 5mm hex wrench.
Riving Knife
Adjustment
The riving knife must be properly aligned with the
blade and positioned the correct distance away
from it to work effectively.
As with changing the blade, always keep the saw
upright, and position the saw along the edge of
a workbench or table so that the blade and riv-
ing knife can be lowered safely down below the
surface edge.
To adjust the riving knife:
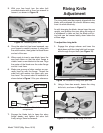
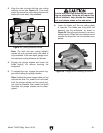
1.
Engage the plunge release and lower the
blade down until the riving knife lock is acces-
sible through the port hole (see Figure 12).
Figure 12. Location of riving knife port hole.
Riving Knife
Port Hole
2. Using a 5mm hex wrench, loosen the riving
knife lock, as shown in Figure 13.
Figure 13. Loosening the riving knife lock.