


-22-
Model T10687 (Mfg. Since 10/12)
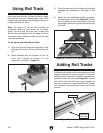
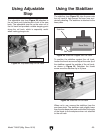
3. Place the saw onto the rail track so the blade
engages the workpiece to the right of the
rail.
4.
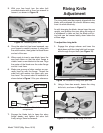
Adjust the rail adjustment knobs to position
the saw along the rail (see Figure 22). When
the rail edge and saw cutting path both line
up straight, the saw is properly set up with the
rail track.
Using your saw with the rail track allows for quick
and precise cuts with minimal setup time. Both
straight cuts and plunge cuts can be made in con-
junction with the rail track.
Note: The bottom of the rail track includes an
oversized rubber lip that serves as a splinter
guard. The first time the track saw is used with
the rail, the saw blade will cut the edge of that lip
to provide a zero-clearance effect, which will help
minimize splintering.
To set up the saw with the rail track:
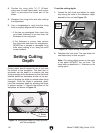
1.
Align the rail track along the workpiece. Use
the right (flat) side of the rail track to plan the
cut.
2.
When satisfied with the position of the rail
track, use F-clamps to secure it to the
workpiece, as shown in Figure 21.
Using Rail Track
Figure 21. Rail track clamped to workpiece.
Figure 22. Location of rail adjustment knobs.
Rail Adjustment Knobs
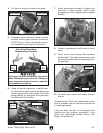
Additional rail tracks can be purchased and joined
together with the rail track connector. To connect
multiple tracks, insert the connector into the inner
grooves of each rail track (see Figure 23). Flip the
rail tracks over and slide the tracks together so
that the connector is equally-distributed. Tighten
the connector set screws into place with a hex
wrench.
Figure 23. Joining two rail tracks.
Connector
Additional
Rail Track
Adding Rail Tracks