


Model T10687 (Mfg. Since 10/12)
-25-
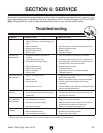
Review the troubleshooting and procedures in this section if a problem develops with your machine. If you
need replacement parts or additional help with a procedure, call our Technical Support at (570) 546-9663.
Note: Please gather the serial number and manufacture date of your machine before calling.
SECTION 6: SERVICE
Troubleshooting
Symptom Possible Cause Possible Solution
Tool does not start. 1. Power supply switched OFF, breaker
tripped, fuse blown, or power supply is at
fault.
2. Motor overloaded.
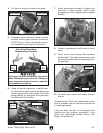
3. Motor brushes at fault.
4. ON/OFF switch at fault.
5. Motor at fault.
1. Ensure power supply is on/has correct voltage.
2. Allow the motor to cool down completely and retry.
3. Remove/replace brushes.
4. Replace switch.*
5. Test/repair/replace.*
Tool stalls or is
underpowered.
1. Workpiece material not suitable for
machine.
2. Tool is undersized for task.
3. Dust collection ducting problem.
4. Motor brushes at fault.
5. Motor bearings at fault.
6. Motor overheated.
7. Motor at fault.
1. Only cut wood/ensure moisture is below 20%.
2. Use correct blade/reduce feed rate or depth of cut.
3. Clear blockages, seal leaks, use smooth wall duct,
eliminate bends, close other branches.
4. Remove/replace brushes.
5. Test/repair/replace.*
6. Clean motor, let cool, and reduce workload.
7. Test/repair/replace.*
Tool has vibration or
noisy operation.
1. Motor or component loose.
2. Blade at fault.
3. Workpiece loose.
4. Motor bearings at fault.
1. Inspect/replace damaged bolts/nuts, and re-tighten
with thread locking fluid.
2. Replace warped/bent blade; resharpen dull blade.
3. Use the correct holding fixture and re-clamp
workpiece.
4. Test by rotating shaft; rotational grinding/loose shaft
requires bearing replacement.*
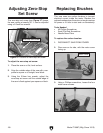
Blade does not
reach 90°.
1. Zero-stop set screw is out of adjustment.
2. Pointer bracket is hitting before the blade
reaches 90°.
1. Adjust the zero-stop set screw (see below).
2. File down the right side of the pointer bracket until
the blade can reach 90°.
Cuts are rough or
wavy; workpiece
rips or splinters.
1. Saw blade is dull.
2. Incorrect blade for workpiece.
3. Excessive force when cutting.
4. Improper blade depth.
1. Resharpen or replace the dull blade.
2. Replace with proper saw blade.
3. Decrease pressure when cutting and allow saw to
move through workpiece at a slower rate.
4. Slightly increase/decrease depth of cut.
Blade is burning
workpiece.
1. Saw blade is dull.
2. Blade installed backward.
3. Incorrect blade for workpiece.
1. Resharpen or replace the dull blade.
2. Remove/reinstall blade correctly.
3. Replace with proper blade.
* Solution should only be carried out by or under the supervision of qualified service personnel.