


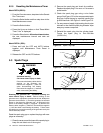


TP-6880 10/14 63Section 5 Scheduled Maintenance
Note: Dispose of all waste materials (engine oil, fuel,
filter, etc.) in an environmentally safe manner.
Note: The oil change procedure requires the use of
rags, a drain tube, and a funnel. Follow the
instructions and use caution to prevent oil from
spilling on or into the alternator.
1. Drain the oil.
a. Press the OFF button on the generator set
controller.
b. Disconnect the utility power to the generator
set.
c. Disconnect the generator set engine starting
battery, negative (--) lead first.
d. Remove the side panel on the exhaust side of
the enclosure.
e. Clean the area around the dipstick and oil fill
cap.
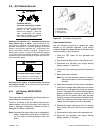
f. To prevent oil from spilling into the alternator,
completely cover the alternator with rags
around the areasnear the oil drainvalve and oil
filter.
g. Insert a drain tube(3/8 in. inside diameter) onto
the oil drain valve and place the end of the tube
into a drain pan. The tube will reduce the
potential for spilled oil.
h. Open the oil drain valve on the engine.
i. Remove the dipstick and oil fill cap. Allow time
for the engine oil to drain completely.
j. Close the oil drain valve and remove the oil
drain tube.
k. Replace the dipstick.
2. Replace the oil filter.
a. Clean the area around the oil filter.
b. Loosen the oil filter by rotating it
counterclockwise with an oil filter wrench.
c. As you remove the oil filter, tilt the filter upward
to prevent oil from spilling.
d. Clean the gasket sealing surface of the oil filter
adapter.
e. Apply a light coat of clean oil to the rubber seal
of the new oil filter.
f. Lightly thread the new oil filter by hand until you
feel Resistance. Then, tighten the filter an
additional 3/4 turn with an oil filter wrench.
3. Fill with oil.
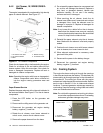
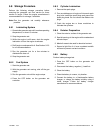
Note: When the oil is drained, some oil remains in the
engine. The amount of oil needed to refill the
engine may be less than the capacity shown in
Figure 5-2. Use the dipstick shown in Figure 5-1
to check the oil level during the fill. Do not fill past
the full mark on the dipstick.
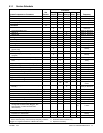
Generator Set Model Oil Capacity, L (qt.)
8RESV/RESVL 1.5 (1.6)
10/12RESV/RESVL 1.9 (2.0)
Figure 5-2 Engine Oil Capacity (new, dry engine)
a. See Section 5.2.3 for the recommended oil
type. To prevent spilling, use a funnel to add oil
through theoil fill port.Use the dipstick tocheck
the oil level before starting to add the final quart
of oil. Fill the engine to the F mark on the
dipstick.
b. Reinstall the dipstick and the oil fill cap.
c. Remove all rags near the alternator and oil
drain valve.
d. Reconnect the generator set engine starting
battery, negative (--) lead last.
e. Reconnect the utility power to the generator
set.
f. Press the RUN button on the generator set
controller. The generator set will start.
g. Run the generator set for a minute to allow the
oil pressure to reach operating range.
h. Stop the generator set, wait 1 minute, and then
recheckthe oillevel. Addoil to bringthe levelup
to the F mark on the dipstick.
4. Check for leaks.
a. Check for oil leaks.
b. Fix leaks and recheck the oil level.
c. Reinstall the side panel.
5. Reset the maintenance timer on the controller.