


P 8/20
Repair
[3] DISASSEMBLY/ASSEMBLY
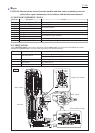
[3]-4. Cylinder Section
Fig. 13 Fig. 14
Fig. 15
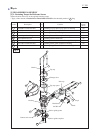
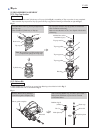
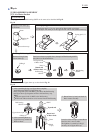
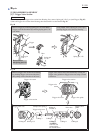
Disassemble Air motor section from the machine by hitting
the end surface of Housing with mallet.
Then remove Internal spur gear section.
After removing Spur gear 10 (5 pcs),
remove the assembly of Carrier complete and
Ball bearing 6001LLU from Internal spur gear 44
by pushing it in the direction of the arrow.
Do the reverse of the disassembling steps. (Figs. 14, 13, 12, 3)
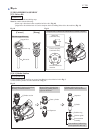
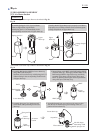
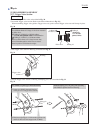
Outer cylinder
O Ring 54
O Ring 45
O Ring 31.5
O Ring 25
O Ring 12.5
O Ring 11
O Ring 12
O Ring 30
Rubber ring 23
Separator
Cylinder
Cushion guide
Front cushion
assembly
3) Sealing rings can be removed from Outer cylinder, Separator, Cylinder, Cushion guide and Front cushion assembly
as illustrated in Fig. 13.
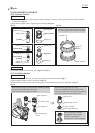
4) From Outer cylinder, remove Cylinder seal as described in Fig. 14.
Outer cylinder
Cylinder seal
Remove Cylinder seal from Outer cylinder
by levering it up with a slotted screwdriver.
Cylinder seal
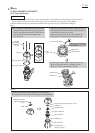
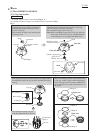
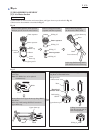
[3]-5. Air Motor Section
1) Disassemble Top cap and Top cap spacer from Housing as described on left in Fig. 3.
2) Disassemble Cylinder section as described in Fig. 12.
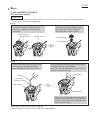
3) Disassemble Air motor section from Housing, then remove Internal spur gear 44 as described in Fig. 15.
Internal spur gear
section
Flat washer 15
Internal spur gear 44
Carrier complete
Outer separator
Do not remove the assembly
by pushing it in the opposite
direction, or the teeth of
Internal gear 44 will be damaged.
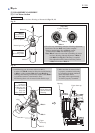
ASSEMBLING
DISASSEMBLING
DISASSEMBLING
Spur gear 10
Ball bearing 6001LLU
Air motor section