


P 9/ 20
Repair
[3] DISASSEMBLY/ASSEMBLY
[3]-4. Bearing box section, Piston, Crank section
DISASSEMBLING
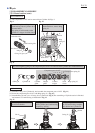
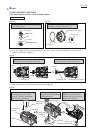
(1) Remove Handle section and Controller cover to hold the machine upright. (Fig. 2)
(2) Separate Barrel section from Crank housing complete (the left illustration in Fig. 6)
(3) Disassemble Cylinder section (Fig. 7)
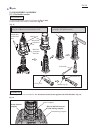
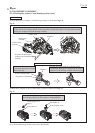
(4) For repairing Piston & Crank section, Motor section has to be separated from Crank housing complete.
Separate Motor housing from Crank housing complete in order of Figs. 17 and 18.
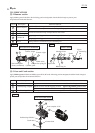
M6x30 Hex socket
head bolt (6pcs.)
M6x30 Hex socket
head bolt (6pcs.)
Gear cover
Disassemble Gear cover, and then,
remove Flat washer 14 and Gear
complete 34-48.
Disassemble Rear cover.
So, Motor housing comes
into your sight.
And then, remove two Needle
gauges and Flat washer 14.
Rear cover
Helical gear 52
Motor
housing
Flat washer 14
Gear
complete 34-48
Needle gauge
1412 (2pcs.)
Flat washer 14
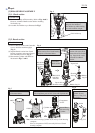
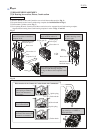
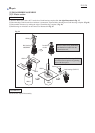
Turn Helical gear 52 until Piston comes
out from Crank housing complete.
O rings on Piston can be replaced in this
step.
Remove Motor housing by levering
it up with 2 pcs. of 1R263 as
illustrated below.
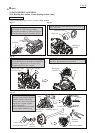
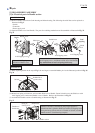
Carbon brush is pressed with
Spiral spring to maintain its
contact with Armature's
commutator.
Carbon brush
Disconnection of the Contact of Carbon brush with Commutator
Spiral spring
Carbon brush
Carbon brush
Spiral spring
Detach Spiral spring
from Carbon brush.
By pulling Carbon brush,
disconnect the contact with
Armature's commutator.
Fig. 17
Fig. 18
1R263
Piston