OM-842 Page 42
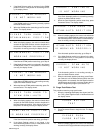
4. If the Mode Selector switch is not placed in the SMAW
position in time, or if the position is not working correct-
ly, the display shows:
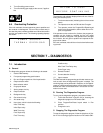
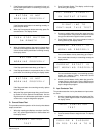
ERROR ! ! SMAW– MANUAL
I S NOT WORK I NG
If the SMAW position is not working correctly, replace
the Mode Selector switch.
5. When the SMAW position tests okay, press Parameter
Select. The display shows:
PLEASE TURN KNOB TO
GTAW– MANUA L POS I T I ON
6. When this display appears, the control unit waits three
seconds for the Mode Selector switch to be placed in
the Manual GTAW position. If this is done in time and
the position is working correctly, the display shows:
GTAW– MANUA L POS I T I ON
WOR K I NG PROP ER L Y
If the Manual GTAW position tests okay, go to Step 8.
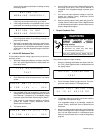
7. If the Mode Selector switch is not placed in the Manual
GTAW position in time, or if the position is not working
correctly, the display shows:
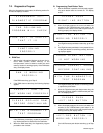
ERROR ! GTAW MANUAL
I S NOT WORK I NG
If the Manual GTAW position is not working correctly,
replace the Mode Selector switch.
8. When the Manual GTAW position tests okay, press Pa-
rameter Select. The display shows:
PLEASE TURN KNOB TO
GTAW SEMI – AUTO
9. When this display appears, the control unit waits three
seconds for the Mode Selector switch to be placed in
the Semi-Automatic position. If this is done in time and
the position is working correctly, the display shows:
SEMI – AUTO POS I T ION
IS WORKING PROPERLY
If the Semi-Automatic position tests okay, go to Step 11.
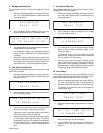
10. If the Mode Selector switch is not placed in the
Semi-Automatic position in time, or if the position is not
working correctly, the display shows:
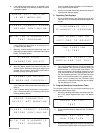
ERROR ! ! SEMI – AUTO
I S NOT WORK I NG
If the Semi-Automatic position is not working correctly,
replace the Mode Selector switch.
11. When the Semi-Automatic position tests okay, press
Parameter Select. The display shows:
PLEASE TURN KNOB TO
GTAW– AUTO POS I T ION
12. When this display appears, the control unit waits three
seconds for the Mode Selector switch to be placed in
the Automatic position. If this is done in time and the po-
sition is working correctly, the display shows:
GTAW– AUTO POS I T ION
IS WORKING PROPERLY
If the Automatic position tests okay, go to Step 14.
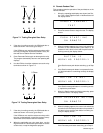
13. If the Mode Selector switch is not placed in the Auto-
matic position in time, or if the position is not working
correctly, the display shows:
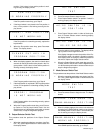
ERROR ! ! GTAW AUTO
I S NOT WORK I NG
If the Automatic position is not working correctly, re-
place the Mode Selector switch.
14. When the Automatic position tests okay, press Param-
eter Select to exit the Mode Selector switch test (the
Reset position is not tested). Use the Right/Increase or
Left/Decrease push button to access another test, or
stop the diagnostics program (see Section 2-4).
G. Purge Push Button Test
This procedure tests the purge push button.
1. When the repeating test displays are shown (see Sec-
tion 7-2C), press Right/Increase or Left/Decrease until
the display shows:
PURGE BUTTON
TEST
2. Press Parameter Select to begin the test. The display
shows:
PLEASE PUSH
PURGE BUTTON
3. When this display appears, the control unit waits three
seconds for the Purge push button to be pressed. If this


