


OM-842 Page 45
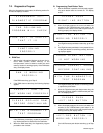
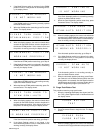
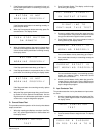
0 Ohms OL
ABC
Figure 7-1. Testing Energized User Relay
4. If the relay is working correctly, the VOM reads the re-
sistances shown. In this case, go to Step 5.
If the VOM does not read the resistances shown while
the relay is energized, contact the nearest Factory Au-
thorized Service Station/Service Distributor.
5. Press Parameter Select again to deenergize the relay.
The program automatically returns to the repeating test
displays.
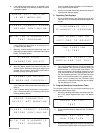
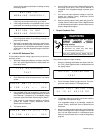
6. Use the VOM to check the resistance across the relay
terminals as shown in Figure 7-2.
ABC
0 OhmsOL
Figure 7-2. Testing Deenergized User Relay
7. If the relay is working correctly, the VOM reads the re-
sistances shown. In this case, go to Step 8.
If the VOM does not read the resistances shown while
the relay is deenergized, contact the nearest Factory
Authorized Service Station/Service Distributor.
8. When the applicable user relay tests okay, use the
Right/Increase or Left/Decrease push button to access
another test, or stop the diagnostics program.
N. Remote Pendant Test
This procedure tests the operation of the push buttons on the
Remote Pendant.
1. When the repeating test displays are shown (see Sec-
tion 7-2C), press Right/Increase or Left/Decrease until
the display shows:
REMOTE PENDANT
TEST
2. Press Parameter Select to begin the test. The display
shows:
PUSH START / I NC
ON REMOTE
3. When this display appears, the control unit waits three
seconds for the Start/Increase push button to be
pressed. If this is done in time and the push button is
working correctly, the display shows:
BUTTON I S
WOR K I NG PROP ER L Y
If the Start/Increase push button tests okay, go to Step
5.
4. If the Start/Increase push button is not pressed in time,
or if the push button is not working correctly, the display
shows:
BUTTON I S NOT
WOR K I NG PROP ER L Y
If the Start/Increase push button is not working correct-
ly, replace the push button.
5. When the Start/Increase push button tests okay, press
Parameter Select. The display shows:
PUSH DECREASE BUTTON
ON REMOTE
6. When this display appears, the control unit waits three
seconds for the Decrease push button to be pressed. If
this done in time and the push button is working cor-
rectly, the display shows:
BUTTON I S
WOR K I NG PROP ER L Y
If the Decrease push button tests okay, go to Step 8.