


25
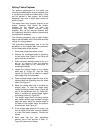
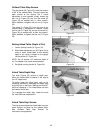
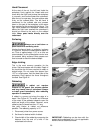
3. Tighten hex nut (B, Figure 38).
4. Repeat for the other set screws as needed.
NOTE: The outfeed table is pre-set at the
factory tighter than the infeed table. If you find
the outfeed table difficult to move with the lifting
handle, loosen the two set screws on the
outfeed table, as just described.
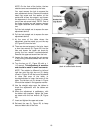
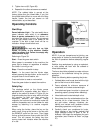
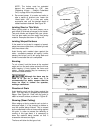
Operating Controls
Start/Stop
Power Indicator Light – The start switch has a
power indicator lamp which is on whenever
there is power connected to the Jointer, not
just when the Jointer is running. Do not assume
that no light means there is no power to the
machine. If the bulb is bad, there will be no
indication. Always check before use.
Do not rely that no light
means no power to the machine. Always
check for power first. Failure to comply may
cause serious injury!
Referring to Figure 39:
Start – Press the green start switch.
When power is connected to the machine, the
green light is always on regardless of whether
the Jointer is running or not.
Stop – Press the red switch to stop.
Reset – In the event that the Jointer stops
without pressing the stop button, as the result of
a tripped fuse or circuit breaker, etc.:
Press red button to reset on main switch.
Press the green button to restart the machine.
Safety Key
The start/stop switch on the Jointer comes
equipped with a magnetic safety key. When in
place on the switch as shown in Figure 39, the
magnetic safety key trips a relay which will allow
the machine to start and stop when the
respective switches are pressed. Being
magnetic, the lock can be removed to make the
machine inoperable and can be hidden for safe
storage by attaching it to another magnetic
surface.
When using the Jointer, place the key on the
switch cover lining up the arrow on the key with
the REMOVE arrow on the cover. Then rotate
the key so that the arrow lines up with the LOCK
arrow. This will prevent the safety key from
coming loose from vibration when the machine
is in use.
Figure 39
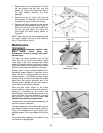
Operation
NOTE: If you are inexperienced at jointing, use
scrap pieces of lumber to check settings and get
the feel of operations before attempting regular
work.
Stabilize long workpieces by using an assistant,
or roller stands set level with the outfeed or
infeed table surface.
The fence should be adjusted to create minimum
exposure to the cutterhead during the jointing
operation.
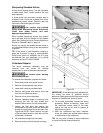
Check the following before operating the jointer:
1. Outfeed table must be set level with the high
point of the knives or knife inserts.
2. Fence adjusted for minimum exposure of
cutterhead, and locked at desired angle.
3. The cutterhead guard must be in place and
operating properly (except when rabbeting).
4. Infeed table set for desired depth of cut.
5. Stand away from the cutterhead and turn the
machine on for a few moments. Listen for
any odd noises, rubbings, vibrations, etc.
Identify and correct such problems before
attempting operations on the jointer.
6. Carefully check your workpiece for knots,
holes, staples or any foreign material that
might damage knives or pose a risk of
kickback. Also check the workpiece for grain
orientation (see “Direction of Grain” on page
27).