


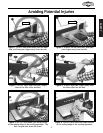

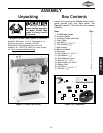
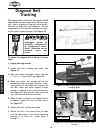


ASSEMBLY
-15-
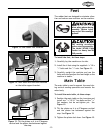
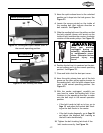
Figure 18. miter gauge holes in main table.
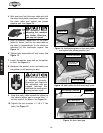
Figure 19. Miter gauge installed.
Miter Gauge
The miter gauge is used when sanding the ends
of workpieces at least 8" long at various angles.
The miter gauge is not a back stop!
To install the miter gauge, do these steps:
1. Locate the miter gauge pivot hole and the
threaded lock-knob hole in the main table.
See Figure 18.
2. Insert the miter gauge pivot pin located at
the underside of the miter gauge into the
pivot hole located at the top of the main
table.
3. Secure the miter gauge to the table using the
miter lock knob as shown in Figure 19.
NOTICE
The miter gauge pivot pin pivots from one
main table location only. Any other hole in
the table is not used for the miter gauge.
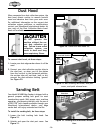
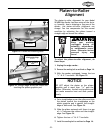
Quick Release Lever
Your Model W1688 Edge Sander is equipped with
the quick release lever that allows you to
release the tension on the belt for quick belt
changing.
To install the quick release lever, do these
steps:
1. Loosen the belt tracking lock knob. See
Figure 16.
2. Slide the quick release lever through the
platen cover lever slot. See Figure 16.
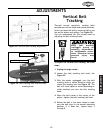
3. Thread the
1
⁄2" jam nut onto the quick
release lever until the nut bottoms at the end
of the lever threads and thread the lever into
the swivel assembly until the lever bottoms.
If required have an assistant push the idler
roller inward to line up the swivel assembly
with the threaded lever. See Figure 17.
4. Tighten the jam nut and the belt tracking
lock knob. See Figure 17.
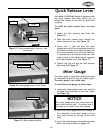
Figure 17. Quick release lever, jam nut, and
swivel assy.
Quick Release
Lever
Jam Nut
Swivel Assy.
Miter Pivot Hole
Threaded Lock Knob Hole
Miter Lock Knob