


ASSEMBLY
-17-
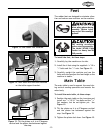
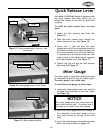
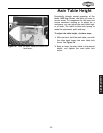
Figure 23. Sanding-belt quick release lever in
the normal operating position.
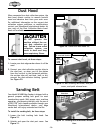
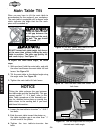
Figure 24. Belt-tracking lock knob.
3. Move the quick release lever to the unlocked
position so it drops into the lock groove. See
Figure 23.
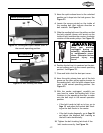
4. Locate the arrows printed on the inside of
the sanding belt that indicate direction or
belt rotation. See Figure 22.
5. Slide the sanding belt over the pulleys so that
the belt rotation (shown with arrows on the
inside of belt) matches the counter-clockwise
rotation of the sander pulleys. See Figure 22.
6. Position the belt so it is centered on the plat-
en and pulleys and is in the normal operating
position. See Figure 23.
7. Close and latch shut the dust port cover.
8. Move the quick release lever out of the lock
groove so the idler pulley applies tension to
the sanding belt, and the quick release lever
rests in the normal operating position. See
Figure 23.
9. With the sander unplugged, carefully use
your hand to rotate the sanding belt a few
rotations in the operating direction to make
sure the belt stays in the normal operation
position.
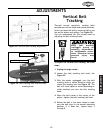
• If the belt tracks to high or to low, go to
Page 19 and adjust the vertical belt track-
ing so the belt tracks in the center.
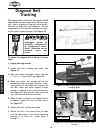
• If the belt tracks diagonally, go to Page 20
and adjust the diagonal belt tracking so
the belt tracks horizontally.
10. Tighten the belt tracking lock knob if the
belt tracks correctly. See Figure 24.
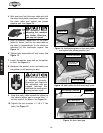
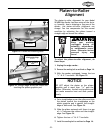
Keep your machine
unplugged during all
assembly, adjustments,
or maintenance proce-
dures. Otherwise serious
personal injury may
occur!
Belt Tracking Knob
Belt Tracking Lock Knob
Quick Release Lever in
Normal Operating Position