


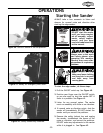


ADJUSTMENTS
-24-
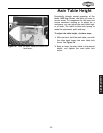
Main Table Tilt
Often you may have to tilt the main table to
accommodate for the angles of your workpiece.
The main table is equipped with a degree scale
which indicates the angle that the the work-
piece will be sanded at.
To adjust the main table angle, do these
steps:
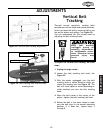
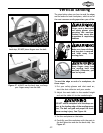
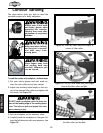
1. With one hand, hold the main table, and with
the other hand loosen the main table tilt lock
levers. See Figure 38.
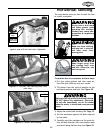
2. Tilt the main table to the desired angle using
the angle scale. See Figure 39.
3. Tighten the main table tilt lock levers.
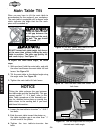
4. Loosen the two table-to-trunnion
5
⁄16"-18 X 1"
hex bolts.
5. Slide the main table toward the platen so
the table-to-platen gap is no more than
1
⁄4"
at both ends of the platen.
6. Tighten the two table-to-trunnion hex
bolts.
Tilting the table increas-
es the gap between the
table edge and the sand-
ing belt. The gap should
NOT exceed
1
⁄4".
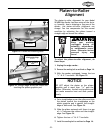
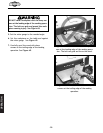
Figure 37. DO NOT loosen both table tilt lock
levers at the same time.
Figure 38. Hold the main table and loosen the
lock lever.
Figure 39. Use the angle scale to find your
desired main table angle.
DO NOT loosen both table height lock levers
at the same time without holding the main
table in position. The table can quickly tilt
and cause injury. See Figure 37.
NOTICE
Tilting the table enlarges the gap between
the table edge and the sanding belt. This gap
cannot exceed
1
⁄4". If it does, refer to the
Main Table procedure of the Assembly sec-
tion for detailed instructions on moving the
table closer to the sanding belt if you need
additional information.
Trunnion
Hex Bolt
Angle Scale