


-17-
Df[\cN(/).=fiDXZ_`e\jD]^%J`eZ\*&()
J<KLG
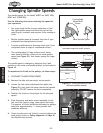
;FEFKfg\iXk\k_\Df[\cN(/).n`k_$
flk Xe X[\hlXk\ [ljk Zfcc\Zk`fe jpj$
k\d% K_`j dXZ_`e\ Zi\Xk\j jlYjkXek`Xc
Xdflekjf]nff[[ljkn_`c\fg\iXk`e^%
=X`cli\kflj\X[ljkZfcc\Zk`fejpjk\d
ZXei\jlck`ej_fikXe[cfe^$k\idi\jg`$
iXkfip`cce\jj%
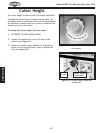
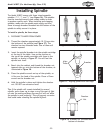
KXYc\@ej\ik8[aljkd\ek
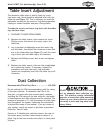
The aluminum table insert is held in place by a cast
iron insert ring, which should be adjusted level with the
table top (see =`^li\(.). This is necessary to avoid the
workpiece catching on the insert or ring during operation,
causing an unsafe condition and poor cutting results.
KfdXb\k_\`ej\ikjXe[`ej\iki`e^c\m\cn`k_k_\kXYc\
kfg#[fk_\j\jk\gj1
(% DISCONNECT SHAPER FROM POWER!
)% Remove the table inserts, then remove the three
Phillips screws that secure the insert ring to the
table top.
*% Lay a precision straightedge across the insert ring
and the table, then adjust the three set screws that
are in the other holes (see =`^li\(.) until the insert
ring is level with the table top in all directions.
+% Replace the Phillips screws, but do not overtighten
them.
,% Replace the table inserts, then use the straightedge
to re-check the inserts. If necessary, repeat this
procedure until both the insert ring and table
inserts are completely level with the table top in all
directions.
=`^li\(.% Leveling the table insert ring.
I\Zfdd\e[\[:=DXk;ljkGfik1%%%%%%%%%%%%%%%% +'':=D
Do not confuse this CFM recommendation with the rating
of the dust collector. To determine the CFM at the
dust port, you must take into account many variables,
including the CFM rating of the dust collector, the length
of hose between the dust collector and the machine, the
amount of branches or Y's, and the amount of other open
lines throughout the system. Explaining this calculation
is beyond the scope of this manual. If you are unsure of
your system, consult an expert or purchase a good dust
collection "how-to" book.
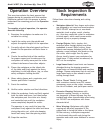
Connect a 4" flexible dust collection hose to the rear of
the cutter guard, and use a hose clamp to secure it in
place. Tug on the hose to make sure that it is firmly held
in place.
;ljk:fcc\Zk`fe