


-23-
Df[\cN(/).=fiDXZ_`e\jD]^%J`eZ\*&()
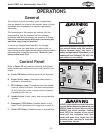
FG<I8K@FEJ
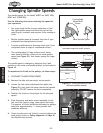
@ejkXcc`e^Jg`e[c\
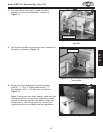
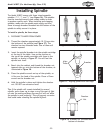
The Model W1827 comes with three interchangeable
spindles—1
1
⁄4", 1", and
3
⁄4" (see =`^li\)-). The spindles
must be inserted correctly and remain stable in order
to produce quality work. When installing and changing
spindles, make sure the spindle seats snugly and that
there is enough drawbar threaded into the bottom of the
spindle to safely secure it in place.
Kf`ejkXccXjg`e[c\#[fk_\j\jk\gj1
(% DISCONNECT SHAPER FROM POWER!
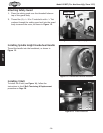
)% Thread the drawbar approximately 10-15 turns into
the bottom of the spindle (see =`^li\).). The
drawbar has two threaded ends. One of them will
remain exposed.
*% Insert the spindle/drawbar into the spindle cartridge
at the top of the table. Line up the notches at
the top of the spindle cartridge with those in the
spindle, as shown in =`^li\).. You will feel the
spindle seat itself.
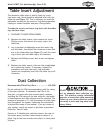
+% Reach into the cabinet and thread the drawbar nut,
tapered side up, onto the bottom of the drawbar, as
illustrated in =`^li\)/.
,% Place the spindle wrench on top of the spindle, so
it fits over the head of the spindle. Place a 15mm
wrench on the drawbar nut.
-% Hold the spindle in place and tighten the drawbar
nut. DO NOT use excessive force.
K`g1@]k_\jg`e[c\n`cci\dX`e`ejkXcc\[]fij\m\iXc
dfek_j#lj\XZc\XeiX^kfn`g\Xm\ipk_`eZfXkf]c`^_k
f`cfekfk_\dXk`e^jli]XZ\jkffdlZ_f`cn`ccefkXccfn
k_\jg`e[c\kfj\Xkgifg\icp %K_`jn`ccgi\m\ekZfiifj`fe
k_XkZflc[dXb\i\dfm`e^k_\jg`e[c\[`]]`Zlck%
=`^li\)-% 1
1
⁄4", 1", and
3
⁄4" spindles.
Align
These
Drawbar
=`^li\).% Aligning spindle and cartridge.
Drawbar
Nut
=`^li\)/% Drawbar nut threaded onto
bottom of drawbar.