


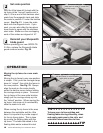


INCRA TS-III ULTRA Shopsmith Owner’s Manual 13
can micro adjust a full 1/4” in either direction.
The scale is marked in 1/32” increments.
IMPORTANT: Do not turn the micro adjusting
knob with the carriage clamp in the “locked”
position. The carriage clamp must always
be “unlocked” and the micro adjust lever
pushed down before micro adjusting the
fence position.
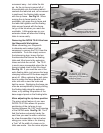
All of the components and features of you
new INCRA TS-III Ultra have been factory set
and should require no further adjustment. If
however, you wish to adjust or recalibrate
these components the following information
is provided to assist in performing the
adjustments.
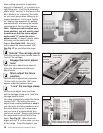
Adjusting the clamping pressure
Note: The Ultra base must be attached to
the base support panel with all six mounting
screws tightened before adjusting the
clamping pressure.
The Ultra base and carriage clamp were
designed to make it easy for the operator to
adjust the clamping pressure to his individual
preference using the supplied clamp pad
shims. Hereʼs how:
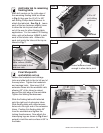
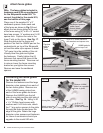
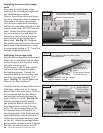
“Unlock” the carriage clamp, slide the carriage
so that its end is about 1” forward of the rear
of the Ultra base and press the micro adjust
lever down. Remove the Phillips head screw
and nylon washer that caps the end of the
clamping pad slot. Your hardware pack
for the INCRA TS-III Ultra includes (3) 6” x
7/8” x .005” clamp pad shims. If you want
to increase the clamping pressure add one
of these shims to the front of the clamping
pad slot. Check the clamping pressure, and
adjust further as necessary. The shim should
be placed to the left (inside) of the 1/8” thick
clamp pad shown in Fig. 29. To decrease
the clamping pressure just remove one of the
thin shims already in place. When you are
satisfied with the clamping pressure replace
the Phillips head screw and nylon washer.
Caution: If you have reduced clamping
pressure by removing a shim, be certain
that adequate pressure remains to hold the
carriage rigidly in place when clamped in
the fully extended position. If not, increase
clamping pressure by adding shims as
described above.
ADJUSTMENTS
TIP
▼▼▼▼▼▼▼▼▼▼▼
At the end of each day, you might
want to micro adjust back to mid-
range on the range scale. This
ensures that youʼll have plenty
of micro adjusting range the next
time you begin a project.
▲▲▲▲▲▲▲▲▲▲▲TIP
Figure 29
To change clamping pressure, add or remove
shims to the left of 1/8” thick clamping pad
Remove screw and washer