


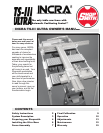


INCRA TS-III ULTRA Shopsmith Owner’s Manual 15
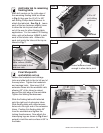
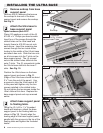
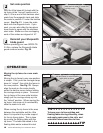
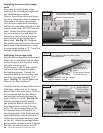
Now locate the carriage so that the Ultra base
is centered approximately between the ends
of racks #2 and #3. Again, lock the carriage
clamp to bridge the two racks and tighten
the accessible mounting screw on rack #3.
Then unlock the carriage and move forward
to tighten the remaining screw on rack #3.
Continue this “bridge and tighten” procedure
for the remaining racks on the carriage.
Adjusting the rip fence and carriage
tracking
If the carriage and rip fence are not gliding
smoothly from the base to the blade the
tracking problem can almost always be traced
to one of two conditions.
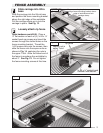
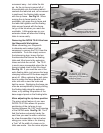
The carriage and Ultra base work best
together when they move parallel to one
another. The Ultra base supports one end of
the carriage while the rip fence supports the
other. If the carriage is mounted too high or
too low to the rear of the rip fence, tracking
problems typically occur. The solution for
this particular condition is really quite simple.
Just adjust the fence mounting bracket up or
down on the rear of the rip fence. The “sweet
spot” is just a few trials away. One method
we have found that works well is to loosen
the fasteners that secure the rip fence to the
carriage then slide the carriage to within 4” of
the Ultra base. Lock the carriage clamp then
tighten the fence mounting fasteners.
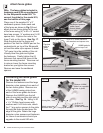
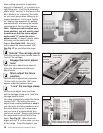
If you find that the above adjustment does not
take care of tracking problems, check that the
mounting and tracking surfaces are aligned.
First use a straight edge to make sure that the
Shopsmith rails are aligned with one another.
Refer to your Shopsmith instructional manual
for information on realigning the rails. Finally
check to make sure that the floating table
that holds the TS-IIIʼs base support panel
is in parallel alignment with the Shopsmith
worktable. If you find these two tables out
of alignment, simply place shims between
the base support panel and the floating table
to bring the base support panel into parallel
alignment with the main worktable.
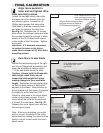
Your INCRA TS-III Ultra is designed to give
many years of virtually maintenance-free
operation. In fact, just keeping your INCRA
product clean is all you need to do to keep
the tool in top shape. Occasionally, remove
the carriage from the Ultra base and brush or
blow out any sawdust or debris that may have
accumulated. Use a toothbrush to clean the
teeth on the INCRA racks on both the carriage
and the base. A light application of paste wax
to the top of the rails from time to time will
keep the rails smooth and clean.
MAINTENANCE
WARRANTY
Taylor Design Group, Inc. warrants this product for one year from date of purchase. We will repair any defects due to
faulty material or workmanship, or at our option, replace the product free of charge. Please return the failing component
only, postage prepaid, along with a description of the problem to the address below. This warranty does not apply to
parts which have been subjected to improper use, alteration, or abuse.
LIFETIME WARRANTY ON POSITIONING RACKS
If an INCRA positioning rack in this tool becomes damaged for ANY reason, Taylor Design Group will replace it free
of charge for as long as you own your tool. Return the damaged rack, transportation prepaid, and allow 2 weeks for
delivery.
Note: Replacements cannot be sent unless damaged racks have been received by Taylor Design Group.
Made in America by:
Taylor Design Group, Inc.
■
P.O. Box 810262
■
Dallas, Texas 75381
■
Tel: (972) 418-4811
■
Fax: (972) 243-4277
■
Web Site: www.incra.com
■
Printed in the U.S.A.© 2002, Taylor Design Group, Inc. INCRA is a registered trademark of Taylor Design Group, Inc.