


14 INCRA Woodworking Tools & Precision Rules
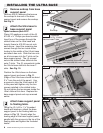
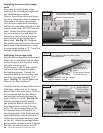
Realigning the micro adjust range
scale
If you wish to verify the mid-range
location of the microadjust range scale
use the following procedure:
“Unlock” the carriage clamp and press
the micro adjust lever down to place the
Ultra base in the micro adjust mode.
Turn the micro adjust knob clockwise
until there is noticeable resistance to the
rotation of the knob. DO NOT force the
knob. Loosen the screws that secure
the micro adjust cursor and align the
last mark on the left end of the range
scale with the left end of the micro
adjust knob. See Fig. 30. Retighten
the mounting screws then turn the micro
adjust knob counterclockwise to return
to a mid-range reading of “0”. “Lock” the
carriage clamp back in place.
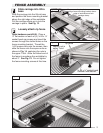
Realigning the carriage racks
Remove the carriage from the base and
loosen the screws which hold the racks
to the carriage so that they slide easily
along the mounting track.
Align the end of rack #1 flush with the
rear end of the carriage and tighten
the mounting screws. Position the
remaining racks on the mounting track
with their ends approximately 1-1/2”
apart. See Fig. 31. Do not tighten the
fasteners for these racks yet.
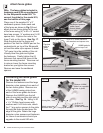
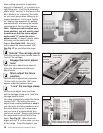
Carefully slide the carriage back into the
Ultra base, taking care not to change
the position of the loose racks. Position
the carriage so that the Ultra base is
centered approximately between the
ends of racks #1 and #2. See Fig. 32.
With the carriage properly located
you should be able to see one of the
mounting screws for each of the two
racks. Pull the carriage clamp up into
the locked position and the rack on
the clamping side of the Ultra base will
automatically align rack #2 with rack #1.
Tighten the accessible mounting screw
on rack #2. Unlock the carriage clamp
and move the carriage forward to tighten
the other mounting screw on rack #2.
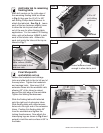
Figure 30
Figure 31
Figure 32
First: In micro adjust mode, rotate knob
clockwise until resistance is encountered
Second: Loosen screws
Third: Align last mark on left end
of scale with left end of knob,
then retighten screws
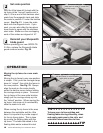
First: Loosen screws that secure racks
to mounting track
Second: Align first rack with carriage
end and retighten screws
Third: Position all
remaining racks 1½”
apart
Do not tighten screws
for these racks yet
1½” approx.
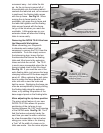
“Bridge” racks and tighten screws
Bridge racks #1
& #2 by locking
carriage clamp
Rack #1
Rack #3
Rack #2
Racks are correctly bridged when one screw on
each rack can be seen