


INCRA TS-III ULTRA Shopsmith Owner’s Manual 9
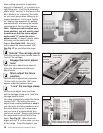
1
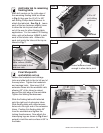
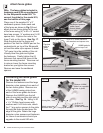
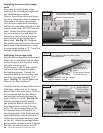
Align fence parallel to
miter slot and tighten Ultra
base mounting screws
Unlock the carriage clamp, then slide
the fence up to the nearest miter slot
and clamp in place. Loosen the (4)
Phillips head screws that secure the
Ultra base to the base support panel
and align the fence to the miter slot.
See Fig. 19. Retighten the (4) screws.
Now unlock the carriage clamp and slide
the carriage forward far enough to allow
access to the (2) Phillips head screws
in the middle of the Ultra base. Tighten
the screws.
Important: If it becomes necessary
to realign the fence in the future,
make sure to loosen all (6) Ultra base
mounting screws.
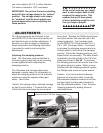
2
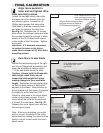
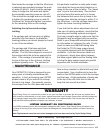
Zero fence to saw blade
Retract the telescoping legs at the right
end of your Shopsmith workstation and
lower the worktable to expose about
1” of the saw blade above the table.
Caution: Always hold the Shopsmith
table height crank firmly as you
loosen the table height lock when
making changes to your worktable
height. Reposition the telescoping legs
so that the work surface is held at 90
degrees to the blade. Now slide the rip
fence forward until just before it contacts
the blade (to within less than 1/32”).
Place the Ultra base in the micro adjust
mode as described on page 13 and
micro adjust the rip fence forward until
it “kisses” the saw blade. See Fig. 20.
Release the micro adjust lever and lock
the carriage in place.
Note: After micro adjusting, you might
want to re-zero the scale on the micro
adjust knob by rotating the scale (not the
knob) to return to zero under the micro
adjust cursor.
Figure 19
FINAL CALIBRATION
Figure 20
First: Loosen all four ULTRA
base mounting screws, align
fence,then retighten screws
Second: Slide carriage forward
to access screws in middle of
ULTRA base and tighten
Miter slot
First: Slide fence forward
to less than 1/32” from
saw blade
Second: Micro adjust fence forward
until fence “kisses” the blade
Micro adjust zero