


For Machines Mfg. Since 8/09 Model SB1029
-25-
OPERATION
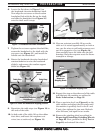
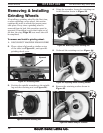
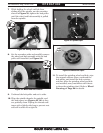
Figure 26. Wheel mounting hub.
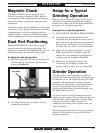
7. Wipe the grinding wheel seat shown in
Figure 26, so it is perfectly clean, and no
paper is left behind.
Note: A slight wiping of the spindle threads,
grinding wheel seat, and hub with a lightly-
oiled rag is acceptable to prevent rust.
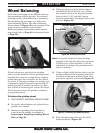
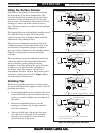
8. Inspect for the paper washers on both sides
of the grinding wheel (see Figure 27). These
paper washers serve as cushions between
the retaining washer and the grinding wheel
seat. Without the washers, cracks can be
spawned from the center of the wheel when
the retaining nut is tightened. Over time,
these cracks can radiate outward and the
wheel may explode causing possible injury.
Figure 27. Important paper washer.
Paper Washer
Note: If you need to replace or install new paper
washers, replacements can be cut out of any
thick construction paper or card stock. Regular
notebook paper or paper from a copy machine
is not acceptable as it is too thin to provide the
required cushion.
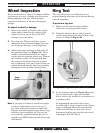
9. Ring test the grinding wheel, even if it is
new. If the wheel is free of cracks, slide the
wheel onto the hub. Refer to Ring Test on
Page 23 for details.
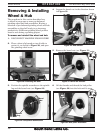
10. Complete the preceding steps in the reverse
order to install the grinding wheel, then use
the grinding wheel dressing tool to true-up
the wheel. Refer to Wheel Dressing on
Page 28 for details.
— After wheel dressing, the hub and
grinding wheel must be removed as an
assembly and balanced. Only after that
will the wheel be able to deliver superior
grinding results. Refer to Removing &
Installing Wheel & Hub on Page 26
to remove the assembly, and refer to
Wheel Balancing on Page 29 for specific
procedures on balancing.
Grinding Wheel
Seat
!