


11
5. Lock switch to OFF position by removing
key from switch box.
For Routers With “LOCK-ON” Feature
The “LOCK-ON” feature that will not permit
the router to be turned ON by the switch box,
but it can be turned OFF by the switch box.
Operate as follows:
1. Place the switch box to ON as previously
described. The router should NOT start
even though the trigger lock is in the
“LOCK-ON” position. Refer to your Router
Owner’s Manual.
2. To start router, depress trigger and
engage “LOCK-ON” button. Router should
start right up.
NOTE: The router will not start if the router
switch is already in the “LOCK-ON” position.
In this case, unlock the trigger, depress the
trigger to start the router, then re-engage the
“LOCK-ON” button.
3. To turn router OFF push switch paddle
down.
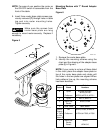
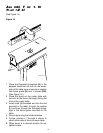
Circuit Breaker (See Figure 12.)
If an overload occurs, the circuit breaker
inside the Switch Box trips and interrupts
power to the router and any accessories. If
this happens:
1. Unplug the power cord.
2. Remove the workpiece from the router bit
and table.
3. Find the cause of the overload and correct.
4. Push the reset button (NN) to reset it. See
Figure 12.
5. Follow instructions under Operation of
Switch Box and Router to reset router.
When router table is not in use
always:
1. Place the switch box in OFF position and
remove the safety key.
2. Place router power switch to OFF position.
3. Unplug switch box from wall outlet.
4. Remove router bit.
5. Make sure router collet assembly is below
router table.
6. Remove and place safety key in a secure
location. Remember where you place
the safety key.
WARNING
If a fuse blows, or a circuit
breaker trips, or the router
stalls, or if the power fails for any other rea-
son, place the switch box in the OFF position,
remove the safety key, and unplug the switch
box from the wall outlet.
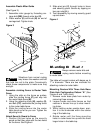
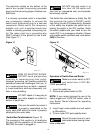
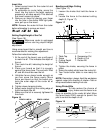
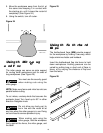
Table Flatness Adjustment
Your router table comes equipped with two “L”
brackets mounted under it to help ensure the
flatness of the working surface. If the router
table should ever become warped, the flat-
ness can be adjusted by shimming under the
“L” bracket. Loosen “L” bracket mounting
screws and place shims or washers as nec-
essary. Tighten “L” bracket screws securely.
Check table top flatness with a straightedge
or the edge of a carpenter’s square. See
Figure 13.
Figure 13
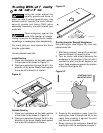
Operation
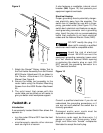
Connecting a Vacuum
A hole is provided in the fence which will
accept standard 2-1/4" vacuum hose connec-
tions. If the vacuum is plugged into the switch
box, it will turn ON and OFF simultaneously
with the router.
WOLF113-27
WARNING