


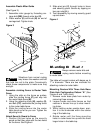

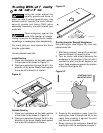


Veining, Fluting, and Grooving
Feed workpiece against the
router bit’s direction of rotation.
Unplug router prior to changing the bit, modify-
ing settings, or making any other adjustments.
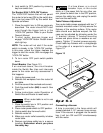
(See Figure 17.)
The edge of the workpiece that slides along
fence must be straight and true for best
results. (Use scrap to test settings.)
1. With the router bit set at the required
depth, place the fence behind the bit at a
distance determined by the previous cut.
Lower safety shield.
2. Secure both clamping knobs.
3. Slide the workpiece against the fence.
Adjust fence for subsequent cuts.
NOTE: For deep work, make successive cuts
until you reach the correct depth. To avoid
overloading router, remove waste material as
you go.
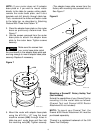
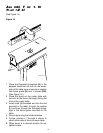
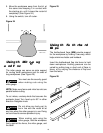
Using the Router as a
Jointer
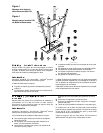
(See Figures 16 and 19.)
NOTE: Make sure boards that are to be joint-
ed together are true and smooth. Also make
sure edges are prepared properly.
1. Position the fence to the desired depth of
the cut.
2. Tighten the fence knobs.
3. Securely tighten the router bit, and make
sure the router is properly assembled to
the router table as previously detailed in
this manual.
4. Place a straight edge against the jointer
offset.
5. Loosen the knob holding the jointer offset
in place.
6. Slide jointer offset out until straight edge
touches the outside diameter of the router
bit.
7. Tighten the jointer offset knob.
8. Swing the safety shield over the router bit.
9. Your router/router table is ready to use.
NOTE: Try a piece of scrap wood to check for
correct adjustment. When standing in front of
router table, feed work from right to left.
WARNING
Figure 19
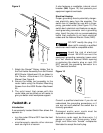
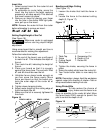
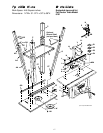
Using Fence with Board
for Larger Workpieces
Four holes in the fence allow for mounting of a
8-inch high (maximum) board for safe and
secure routing of larger workpieces.
(See Figure 20.)
1. Attach board to fence with 4 woodscrews
(not provided).
2. Board can be notched out prior to routing
or router bit profile can be made in board
by driving board thru router bit.
3. Position the fence to the desired depth of
the cut.
4. Tighten the fence knobs.
5. Securely tighten the router bit, and make
sure the router is properly assembled to
the router table as previously detailed in
this manual.
6. Your router/router table is ready to rout
large workpieces.
Figure 20
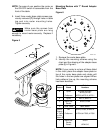
WOLF113-53
PULL ON
PUSH OFF
RESET
OUTLETS
WOLF113-15
DEPTH OF CUT
FENCE KNOBS
JOINTER OFFSET
14