G0504 16" Horizontal Resaw Bandsaw -37-
Replacing V-Belts
If the belts deteriorate or break, they will need
to be replaced. When replacing one belt, you
should replace all of them at the same time to
ensure uniform belt tension and save time.
To replace the V-belts
:
1. Disconnect the resaw from the power
source!
2. Read the previous subsection titled “Adjusting
V-Belt Tension” to become familiar with the
V-belt tension controls.
3. Adjust the motor mount nuts down as far as
they will go.
4. Remove all three V-belts that connect the
motor to the wheel pulley. (The easiest way
to take the belts on/off is to roll them on/off
the pulley one at a time. The belts can then
be fit over the wheel.)
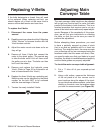
5. Remove and replace the hydraulic pump
V-belt. (Refer to Page 35 for information on
how to loosen/tension this V-belt.)
6. Replace the three V-belts as a matching set.
Matching sets can be identified by the batch
number on the belt—NOT to be confused
with the size markings of the belt.
7. Tension the newly installed V-belts.
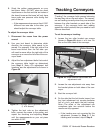
Figure 38. Test board with measurements.
The main conveyor table height can be adjusted
left-to-right and front-to-back to make the table
parallel to the blade in both directions. This is an
involved procedure that requires you to cut up a
piece of test stock and make many repeat adjust
-
ments. Because of the complexity of this proce
-
dure, we will first give instructions on checking
the table, so that you can be sure you need to
perform the adjustment.
Before attempting these procedures, you need
to have a perfectly squared up piece of stock
that is as wide as possible and is at least two
feet long. The wider the stock, the more accurate
your procedure will be (we recommend using the
maximum width that the resaw will allow). Also,
you need to make sure that your blade is in good
condition, the blade is tracked/tensioned properly
and the blade guides are properly adjusted.
To check the main conveyor table alignment:
1. Cut a
1
⁄4" slice off of your squared-up test
stock.
2. Using a dial caliper, measure the thickness
of the cut piece at all four corners and in
even locations along the edges of the stock.
As you take these measurements, write them
directly on the stock, near the location where
you took the measurement (see Figure 38).
Adjusting Main
Conveyor Table


