


Model G0690/G0691 (Mfg. 11/10+)
-53-
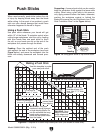
When used correctly, push sticks reduce the risk
of injury by keeping hands away from the blade
while cutting. In the event of an accident, a push
stick can also absorb damage that would have
otherwise happened to hands or fingers.
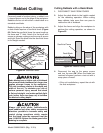
Using a Push Stick
Use push sticks whenever your hands will get
within 12" of the blade. To maintain control when
cutting large workpieces, start the cut by feeding
with your hands then use push sticks to finish
the cut, so your hands are not on the end of the
workpiece as it passes through the blade.
Feeding: Place the notched end of the push
stick against the end of the workpiece (see inset
Figure below), and move the workpiece into the
blade with steady downward and forward pres-
sure.
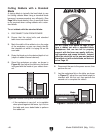
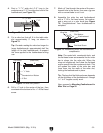
Push Sticks
Figure 78. Using push sticks to rip narrow stock.
Feeding
Supporting
Blade
Path
Push Stick
Push Stick
Push Stick
Prohibition
Zone
Store Push
Stick Here
for Easy
Access
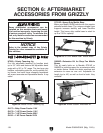
Supporting: A second push stick can be used to
keep the workpiece firmly against the fence while
cutting. When using a push stick in this manner,
only apply pressure before the blade; otherwise,
pushing the workpiece against or behind the
blade will increase the risk of kickback (see "Push
Stick Prohibition Zone" in the Figure below).
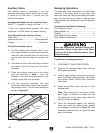
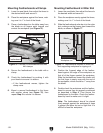
90º
Cut here to
push
1
⁄4" stock
Cut here to push
1
⁄2" stock
Notch for placing on
corners of workpieces
15
3
/
4
" Minimum Length
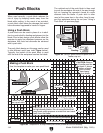
MATERIAL: Only use
hardwood, sturdy plywood,
or high-density plastic. Do
not use softwood that may
break under pressure or
metal that can break teeth
from the blade!
SANDING: Sand
edges to remove
rough edges and
increase comfort.
SIZING: Push stick
must be at least 15
3
⁄4"
long. Use
1
⁄2"–
3
⁄4" thick
material.
Notch to help
prevent hand
from slipping
1
⁄2" Grid
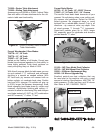
Figure 80. Template for a basic shop-made push stick (not shown at actual size).
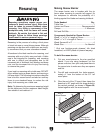
Figure 79. Side view of a push stick in-use.
Making a Push Stick
Use this template to make
your own push stick.